Skip to content

The Machine · Snacks

The Servo Mallet

Design stage

Updated 2026-10-21

A micro servo swings a springy mallet onto a small singing bowl on every note. A servo is slow next to a solenoid, so the lesson is starting early: the swing begins before the note, and the mallet's flex carries it the last few millimetres.

Loading the model

Drag to turn · scroll to zoom

Printed

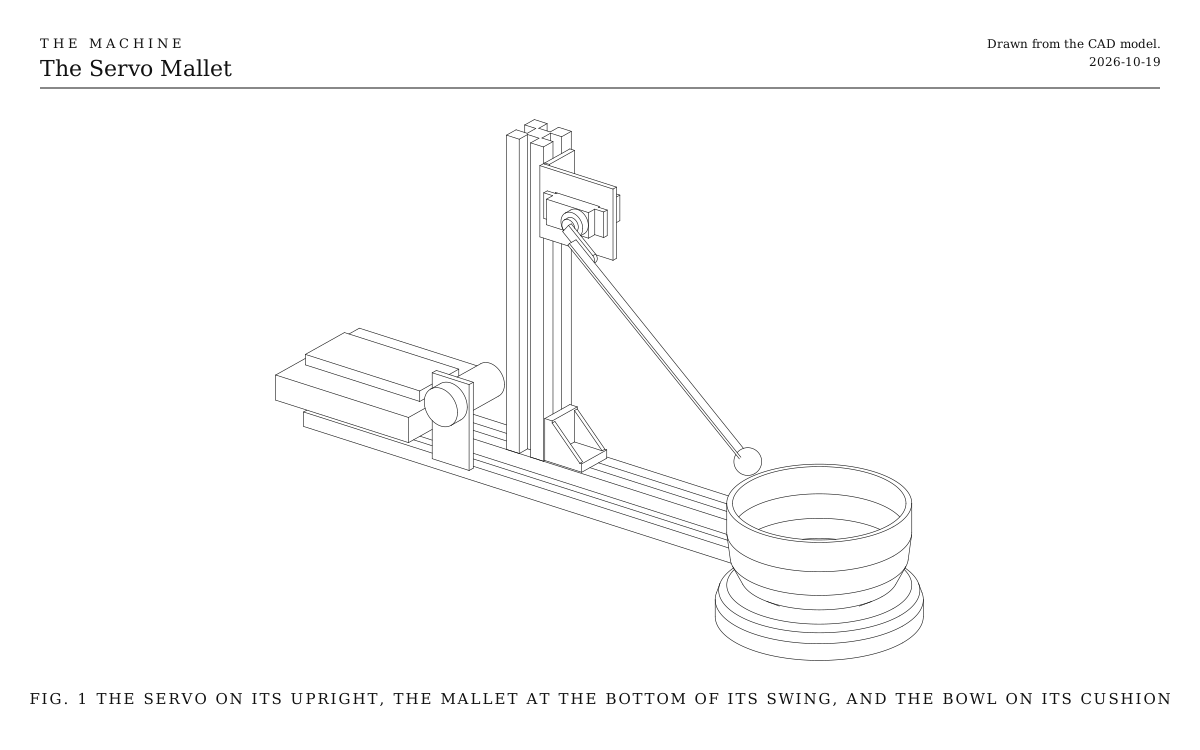
3DWhere we started. This is one version: an MG90S micro servo near the top of a short upright, swinging a long cable tie with a wooden bead on its end onto the rim of a small singing bowl on its cushion. Everything is bought.

Overview

Cost, roughly
About $40
Building
An evening
Difficulty
Easy
The whole snack. A line drawing of the 3D model above.
Fig. 1The whole snack. A line drawing of the 3D model above.

How it works

  • A servo goes to the angle it’s told. The ESP32 sends it a pulse every 20 ms, and the pulse’s width is the angle. The servo’s own motor, gears and sensor do the rest.
  • It’s slow, so it starts early. Swinging the mallet from rest to the bowl takes tens of milliseconds, far longer than a solenoid’s few. The Bridge sends each note about a second ahead, so the program has time to start the swing exactly that long before the note.
  • The stem finishes the strike. The servo stops just short of the bowl. The cable tie is springy, so it bends as the servo stops, and the bead carries on onto the rim and bounces straight back off. A mallet that stays on the bowl chokes it; one that bounces lets it ring.
  • Then it swings back. A moment after the strike it returns to rest, ready for the next note.

What it teaches

  • Servos and their timing. Lapless Steel plucks with a servo, the Windmill Arpeggio Machine swings its pick in and out with one, the Looping Brush Drum times its lift servo so the broom meets the drum on its note, and the E-Bow lowers its arm early by however long its note takes to swell. Each one starts a move early by its travel time, as the Mallet does.
  • A supply of its own. Servos pull hard when they start. Giving them their own supply, with a capacitor, and joining the grounds, is how every element with servos keeps its ESP32 from restarting.
  • Letting the material do the work. The servo is precise but stiff. The springy stem turns its stop into a strike.

Notes

  • This is a first design, not yet built. The model shows the version we started with.
  • Costs are rough estimates for budgeting, not checked prices. They don’t include the ESP32-S3 board.
  • The firmware compiles, and when each swing starts is tested on a computer against simulated notes. It hasn’t yet run on a built Mallet. It listens for Control, the one broadcast signal every element hears.

Parts

Ingredients

KindPartQtyEach
BoughtMicro servo, MG90S, with its horns and screwsMetal gears, and about 0.1 s to turn 60 degrees at 5 V. Cheapest in packs of several. The single-arm horn carries the mallet.1$3.00
BoughtAluminum bracket for a micro servoHolds the servo by its tabs, with a flat foot that screws to the upright.1$2.00
BoughtCable tie, about 300 mm long and 4.8 mm wide, and a 12 mm wooden beadYour choice: see The malletThread the tie through the bead and fix it with a dab of hot glue. Screw the tie's other end to the horn.1$0.30
BoughtSinging bowl, about 8 cm across, with its cushionYour choice: see What it strikes1$12.00
BoughtWall supply, 5 V 2 A, with a 5.5 x 2.1 mm barrel plugThe servo's own supply. Its starts and stalls would brown out the ESP32 on a USB port.1$7.00
BoughtBarrel jack to screw terminal adapter, 5.5 x 2.1 mm1$2.00
BoughtElectrolytic capacitor, 470 to 1000 µF, 10 V or moreAcross the servo's supply, so its start doesn't pull the supply down.1$0.30
BoughtESP32-S3 board, such as an ESP32-S3-DevKitC-1, on a screw-terminal expansion boardNot counted in the cost. Any ESP32-S3 board does, a new one is about $15. Its own colour LED shows the status light.1·
BoughtMomentary push button, normally open, for the test buttonA short press strikes three times, half a second apart.1$1.00
BoughtAluminum extrusion, 20 mm V-slot, 250 mm, the baseOr the Stop Bar's bar, if you built it.1$4.00
BoughtAluminum extrusion, 20 mm V-slot, 150 mm, the upright1$2.00
BoughtCorner bracket for 20 mm V-slot, cast, with its M5 screws and T-nuts1$1.00
BoughtM3 drop-in T-nuts for 20 mm V-slot, with M3 x 8 screwsHold the servo bracket to the upright.2$0.30
BoughtHookup wire, 22 AWG, red, black and a signal color1$3.00
Total$38.20

Tools

  • Small screwdriver, for the screw terminals and the horn screw
  • Hex keys, 2.5 and 3 mm
  • Hot glue gun
  • Wire strippers
  • A USB cable that carries data, for loading the program and for the console

Choices

Decisions that are yours to make. Where we started is the version in the 3D model and the ingredients: a starting point, not the right answer.

The mallet

What does the servo swing?

A long cable tie with a wooden bead glued on its endWhere we started

SoundA soft, round strike, and the bowl rings on

Nearly free, and springy enough to flick the bead onto the rim and straight off again. Cut it to length to change how much it flexes.

Spring steel wire, about 1 mm, with a rubber or felt bead

SoundThe cleanest strike, with a quick bounce

About $3 for a length of music wire. It springs back the most evenly, so the strikes are the most alike. Bend a small loop at the horn end to screw it on.

A bamboo skewer or a chopstick

SoundA harder, brighter knock

Free. It barely flexes, so the servo has to stop exactly at the rim. A little short and it misses; a little far and it presses on the bowl and chokes it.

What it strikes

What rings?

A small singing bowl, about 8 cm, on its cushionWhere we started

SoundA long, warm ring

About $12. It rings for seconds, so even slow notes overlap into a wash. It sits beside the bar, not on it.

A small brass bell hung from a cord

SoundA bright ring that dies sooner

About $5. Hang it from a corner bracket on the upright with a loop of cord, so it swings a little when struck and doesn't choke.

A wine glass with a little water

SoundA pitched ping. More water, lower note

Free, and you can tune it. Fragile, so start with a short swing.

Assembly

  1. 1

    Load the Servo Mallet's program onto the ESP32-S3, as the firmware's README describes for the listener, with servo-mallet in place of listener.

  2. 2

    Stand the upright on the base with the corner bracket, about halfway along.

  3. 3

    Screw the servo into its bracket, and the bracket near the top of the upright's side with the two M3 T-nuts, the servo's shaft facing you.

  4. 4

    Wire the servo, the capacitor and the 5 V supply as on the Wiring tab, with the supply unplugged. Plug it in.

    CheckThe servo turns to its rest angle and holds there.

  5. 5

    Push the horn onto the shaft pointing up and back, then screw on the cable tie and its bead.

    TrickyThe horn's splines only fit at set angles. If the mallet doesn't point where you want at rest, take the horn off and move it one tooth, rather than changing the angles in the program by a lot.

  6. 6

    Set the bowl on its cushion beside the bar's end, under the mallet's arc.

  7. 7

    Type strike 95 into the console, then try. Raise or lower the number a few degrees at a time until the bead stops about 3 mm short of the rim with the stem straight.

    CheckOn a try, the stem flexes, the bead flicks onto the rim and off again, and the bowl rings on.

  8. 8

    Activate the Bridge.

    CheckThe mallet strikes on every beat, and the light flicks white with each swing.

Wiring

The servo runs from its own 5 V supply, with a capacitor across it. Its signal comes from GPIO 16, and its ground joins the ESP32's, so the signal has something to be measured against. The ESP32 runs from USB. The status light is the board's own colour LED.

Wiring · The Servo Mallet
PowerSignalGround, all joinedPins drawn faint are left empty.

Wire list

  1. USB, from a charger or the laptop, 5V

    ESP32-S3 board, USB

    PowerUSB cable

  2. Wall supply, 5 V, +

    Micro servo, MG90S, red +

    PowerRed, 22 AWG

  3. Capacitor, 470 µF, +

    Wall supply, 5 V, +

    PowerThe capacitor's own leg

    Clamp its legs in the adapter's screw terminals with the servo's wires. The stripe on its side marks the − leg.

  4. Wall supply, 5 V, −

    Micro servo, MG90S, brown −

    GroundBlack, 22 AWG

  5. Capacitor, 470 µF, −

    Wall supply, 5 V, −

    GroundThe capacitor's own leg

  6. Wall supply, 5 V, −

    ESP32-S3 board, GND

    GroundBlack, 22 AWG

    Joins the servo's ground to the ESP32's. Without it the servo twitches or ignores its signal.

  7. ESP32-S3 board, GPIO 16

    Micro servo, MG90S, orange signal

    SignalAny color, 22 AWG

    A pulse every 20 ms. Its width sets the angle.

  8. Test button, 1

    ESP32-S3 board, GPIO 14

    SignalAny color, 22 AWG

    The test button. The ESP32's own pull-up holds the pin high until it's pressed.

  9. Test button, 2

    ESP32-S3 board, GND

    GroundBlack, 22 AWG

Get these right

Never from the board's 5 V pin
A servo starting up pulls far more than USB gives, and the ESP32 restarts mid-swing. Every element with servos gives them their own supply for this reason.

Mounting

The servo and its mallet hang on a short upright on the base bar. Every part fixes to the extrusion with T-nuts, so the servo slides up or down and the upright along, with a hex key.

The upright
About halfway along the base, joined by a corner bracket, so the mallet's swing ends just past the base's end.
The servo
In its aluminum bracket, near the top of the upright's side, on two M3 screws into drop-in T-nuts. Slide it up or down to change where the mallet meets the bowl.
The bowl
On its cushion on the bench, just past the base's end and in line with the mallet's swing, so the bar doesn't carry its ring away. Mark the cushion's place with tape once it sounds right.
The electronics
The board on its expansion board on the base's other end, on double-sided foam tape, with the test button beside it. On the Stop Bar, in its box.

Tuning

Tuning

The strike angle
The servo should stop short of the bowl and let the stem do the rest. If the bead presses on the rim, the ring is choked: lower the strike angle. If it misses on soft swings, raise it, or lengthen the stem so it flexes more.
How early it swings
The swing takes about 60 ms to reach the rim, depending on the servo and how far it swings. With the Bridge playing alongside a click, type swing 50 or swing 80 into the console until the strike lands on the click. Then write it, and the two angles, into the settings at the top of the program.
How fast it can repeat
Each note needs a swing out, a short hold and a swing back, about a sixth of a second. Notes closer together than that are skipped, and the console counts them. Swinging less far makes it quicker.

Variations

Louder notes, a longer swing
The program swings the same distance for every note. Starting the swing further back for loud notes strikes harder, at the cost of a longer, varying travel time that the program has to start early for.
Two bowls
A second servo on GPIO 17 with its own mallet and a second bowl, a different size. Give each its own note.