Skip to content

The Machine · Snacks

The Music Box Crank

Design stage

Updated 2026-10-21

A stepper motor turns a paper-strip music box's crank in time with the Bridge, one turn a beat. The tune is punched in the strip, so this snack plays no notes of its own. It follows the beat itself, which is what every element that turns or swings in time has to do.

Loading the model

Drag to turn · scroll to zoom

Printed

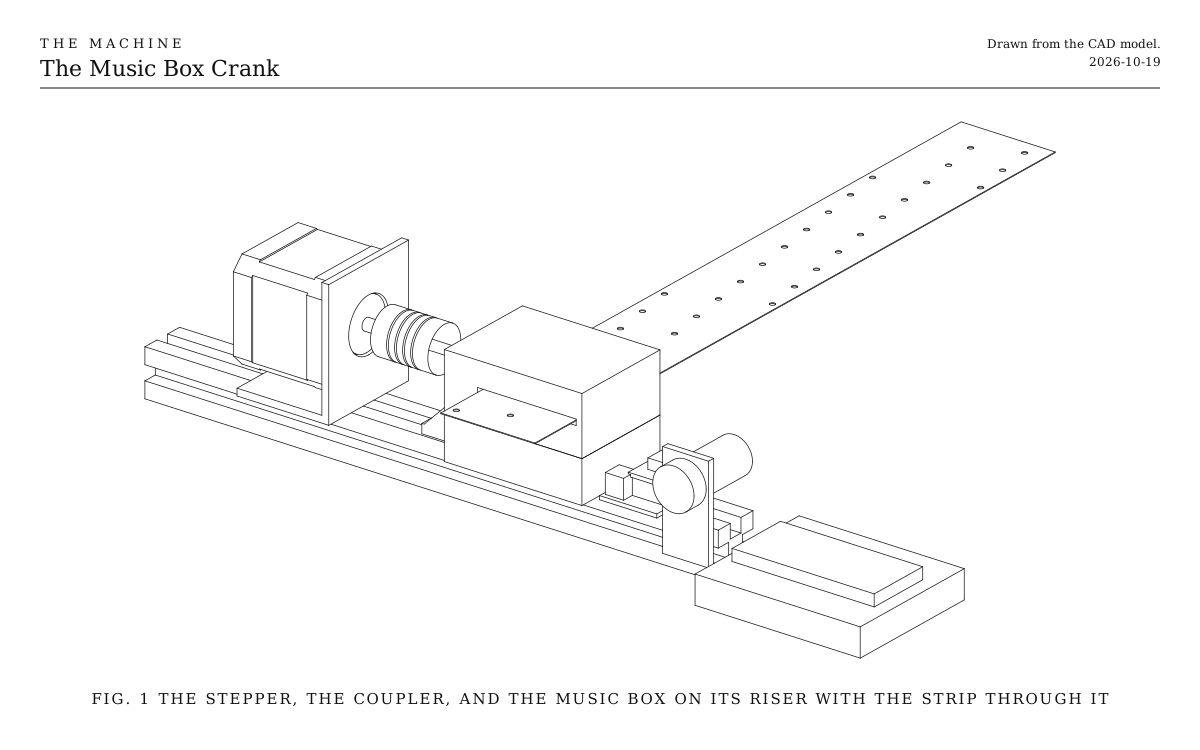
3DWhere we started. This is one version: a NEMA 17 stepper on an L-bracket, joined by a flexible coupler to the crank shaft of a 15-note paper-strip music box, with the strip running across the bar. Everything is bought.

Overview

Cost, roughly
About $80
Building
A weekend, with an evening punching the strip
Difficulty
Moderate
The whole snack. A line drawing of the 3D model above.
Fig. 1The whole snack. A line drawing of the 3D model above.

How it works

  • The tune is in the strip. A paper-strip music box plays whatever is punched in its strip, as fast as the crank turns. The snack’s job is only to turn the crank in time.
  • It follows the beat, not the notes. The Bridge keeps a shared timeline: where the beat is and how fast it’s going. The program reads it many times a second, sets the crank’s speed from the tempo, and nudges the crank a little ahead or behind until each beat falls at the same point in a turn.
  • It starts and stops smoothly. The crank speeds up and slows down over about half a second, so the strip doesn’t jerk. When the Bridge stops playing, the crank winds down to a stop. On a stop, the driver lets go at once.
  • A stepper turns by counted steps. Every pulse on the driver’s STEP pin turns the motor an eighth of a 1.8 degree step, so the program always knows how far the crank has gone. It uses the same stepper code as the Gantry pendulums.

What it teaches

  • Following the beat. The Windmill Arpeggio Machine turns its wheel one bar a turn, the Looping Brush Drum steps its carrier in time with the beat, and the Pellet Drum’s motor speed is its tempo. Each reads the Bridge’s timeline and holds its motion to the beat, as the crank does.
  • Steppers and their drivers. The NEMA 17 and the TMC2209 are the motor and driver most elements with a stepper use, from the Gantry pendulums’ carriages to the Chime Ring’s turret and the Jar Flipper’s flips, wired the same way, with the same rules: set the current first, and never unplug a motor that has power.

Notes

  • This is a first design, not yet built. The model shows the version we started with.
  • Costs are rough estimates for budgeting, not checked prices. They don’t include the ESP32-S3 board.
  • The firmware compiles, and its timing is tested on a computer against a simulated Bridge: it locks onto the beat from any starting point, follows a change of tempo, and never turns backward. It hasn’t yet run on a built crank. It listens for Control, the one broadcast signal every element hears.
  • How far a strip moves in one turn, and the crank shaft’s size, depend on the movement you buy. Measure yours.

Parts

Ingredients

KindPartQtySourceEach
BoughtPaper-strip music box movement, 15 notes, with a hole punch and blank stripsYour choice: see The music box1Amazon, as a 15-note music box kit$25.00
BoughtNEMA 17 stepper motor, 1.8 degree, about 40 N·cm, 40 mm bodyThe same size of motor as the Gantry pendulums and the Windmill Arpeggio Machine.1·$14.00
BoughtTMC2209 stepper driver, such as BIGTREETECH's V1.3Left in its standalone mode, it steps in eighths and smooths them inside, so the motor runs quietly.1BIQU$8.00
BoughtElectrolytic capacitor, 100 µF, 25 V or moreAcross the driver's motor supply, as on every element with a stepper.1·$0.30
BoughtFlexible shaft coupler, 5 mm to your crank shaft's sizeYour choice: see The join1·$3.00
BoughtL-bracket for a NEMA 17, Pololu 2266, with its screws1Pololu$7.00
BoughtWall supply, 12 V 2 A, with a 5.5 x 2.1 mm barrel plug, and a barrel jack to screw terminal adapterThe Tapper's supply does, if you built it.1·$11.00
BoughtESP32-S3 board, such as an ESP32-S3-DevKitC-1, on a screw-terminal expansion boardNot counted in the cost. Any ESP32-S3 board does, a new one is about $15. Its own colour LED shows the status light.1··
BoughtMomentary push button, normally open, for the test buttonA short press turns the crank for four seconds at 60 beats a minute.1·$1.00
BoughtAluminum extrusion, 20 mm V-slot, 250 mm, the baseOr the Stop Bar's bar, if you built it.1·$4.00
BoughtCorner bracket for 20 mm V-slot, cast, with its M5 screws and T-nutsHolds the music box's riser.1·$1.00
BoughtM5 x 10 screws and T-nuts for 20 mm V-slotFix the motor's L-bracket to the bar.2·$0.30
BoughtHookup wire, 22 AWG, red, black and a signal color1·$3.00
SalvagedA scrap of wood to raise the music box, and double-sided foam tapeIts thickness brings the crank shaft level with the motor's.1··
Total$77.90

Tools

  • Small screwdriver, for the screw terminals and the crank's screw
  • Hex keys, 2 to 3 mm
  • Calipers or a ruler with millimetres, to measure the crank's shaft
  • A multimeter, to set the driver's current and find the motor's coils
  • A pencil and a long ruler, for marking the strip
  • A USB cable that carries data, for loading the program and for the console

Choices

Decisions that are yours to make. Where we started is the version in the 3D model and the ingredients: a starting point, not the right answer.

The music box

Which movement?

A 15-note paper-strip movement, with a hole punch and blank stripsWhere we started

SoundA small, sweet plink, one octave and a bit, no sharps or flats

About $25 as a kit. Easy to punch, and most simple tunes fit. Ones in a printed box, like Kikkerland's, cost more but the movement is the same kind.

A 30-note paper-strip movement

SoundFuller, with a wider range and some sharps and flats

About $40 with a punch and strips. More of a tune fits, and chords. It's bigger, wants a little more push from the motor, and its strips are wider.

The join

How does the motor turn the crank?

A flexible coupler on the crank's shaftWhere we started

SoundSilent

Take the handle off, usually one small screw, and measure the shaft. Flexible couplers come with a 5 mm bore for the motor and 3, 4 or 5 mm for the other side. It forgives a little misalignment.

The handle left on, pushed round by a fork on the motor's shaft

SoundA faint click as the fork takes up the slack

Nothing to take apart, and it lines up loosely. The fork has to be made, cut from a scrap or printed. It only pushes one way, which is the only way a music box turns anyway.

Assembly

  1. 1

    Load the Music Box Crank's program onto the ESP32-S3, as the firmware's README describes for the listener, with music-box-crank in place of listener.

  2. 2

    Take the crank's handle off and measure its shaft. Buy or pick the coupler to match.

  3. 3

    Screw the motor to its L-bracket, and the bracket to the bar with two M5 screws and T-nuts.

  4. 4

    Fix the music box to its wooden riser with foam tape, and the riser to a corner bracket on the bar, so the crank shaft lines up with the motor's.

    TrickyLine them up by eye from above and from the side. A coupler that bends on every turn makes the speed wobble, which you hear as a wobble in the tune.

    CheckWith the coupler on both shafts, the motor turns the crank by hand without the coupler bending.

  5. 5

    Set the driver's current before the motor is connected, as its maker's guide describes, to about half the motor's rated current.

    TrickyNever connect or disconnect the motor while the driver has power. It can destroy the driver.

  6. 6

    Wire the driver, the capacitor, the motor and the supply as on the Wiring tab, with the supply unplugged. Plug it in and press the test button.

    CheckThe crank turns smoothly for four seconds, a turn a second, and the tune plays. If it turns backwards, swap the two wires of one coil.

  7. 7

    Mark the strip in beats. Turn the crank one full turn by hand and mark how far the strip moved; that's one beat. Rule lines that far apart down the strip, and punch the notes on them, or halfway between for eighths. Leave two beats blank at the start.

  8. 8

    Activate the Bridge.

    CheckThe crank starts, settles onto the beat within a beat or two, and follows the Bridge's tempo. When the Bridge stops playing, it slows to a stop.

Wiring

The motor runs from a 12 V supply through the TMC2209 driver. The ESP32 runs from USB and gives the driver its 3.3 V logic supply and three signals: a pulse on STEP for every eighth of a step, DIR for the direction, and EN to let the motor go when it's idle. The driver's two grounds both join the supply's. The status light is the board's own colour LED.

Wiring · The Music Box Crank
PowerSignalMotorGround, all joinedPins drawn faint are left empty.

Wire list

  1. USB, from a charger or the laptop, 5V

    ESP32-S3 board, USB

    PowerUSB cable

  2. Wall supply, 12 V, +

    TMC2209 driver, VM

    PowerRed, 22 AWG

  3. Capacitor, 100 µF, +

    TMC2209 driver, VM

    PowerThe capacitor's own leg

    Solder its legs straight onto the driver's VM and GND pins. The stripe on its side marks the − leg.

  4. ESP32-S3 board, 3V3

    TMC2209 driver, VDD

    PowerRed, 22 AWG

    The driver's logic runs at the ESP32's 3.3 V, so their signals match.

  5. Wall supply, 12 V, −

    TMC2209 driver, GND

    GroundBlack, 22 AWG

    The motor's return. Use the GND pin next to VM.

  6. Capacitor, 100 µF, −

    TMC2209 driver, GND

    GroundThe capacitor's own leg

  7. ESP32-S3 board, GND

    TMC2209 driver, GND

    GroundBlack, 22 AWG

    The driver's other GND pin, next to VDD.

  8. ESP32-S3 board, GPIO 16

    TMC2209 driver, STEP

    SignalAny color, 22 AWG

  9. ESP32-S3 board, GPIO 17

    TMC2209 driver, DIR

    SignalAny color, 22 AWG

  10. ESP32-S3 board, GPIO 18

    TMC2209 driver, EN

    SignalAny color, 22 AWG

    Low runs the motor. High lets it go, so the crank turns freely by hand.

  11. TMC2209 driver, 1A

    Stepper motor, A1

    MotorThe motor's own cable

    1A and 1B go to one coil, 2A and 2B to the other.

  12. TMC2209 driver, 1B

    Stepper motor, A2

    MotorThe motor's own cable

  13. TMC2209 driver, 2A

    Stepper motor, B1

    MotorThe motor's own cable

  14. TMC2209 driver, 2B

    Stepper motor, B2

    MotorThe motor's own cable

  15. Test button, 1

    ESP32-S3 board, GPIO 14

    SignalAny color, 22 AWG

    The test button. The ESP32's own pull-up holds the pin high until it's pressed.

  16. Test button, 2

    ESP32-S3 board, GND

    GroundBlack, 22 AWG

Get these right

Finding the motor's coils
Motor wire colors vary by maker. Touch two wires together and turn the shaft by hand; if it suddenly turns stiffly, those two are one coil. If the crank turns backwards, swap the two wires of one coil.
Never unplug the motor with power on
Disconnecting a running stepper can destroy its driver. Unplug the supply first, or press the Stop Bar's button if it's on one.
The same pins as Gantry Pendulum
STEP, DIR and EN are on GPIO 16, 17 and 18, as on the Gantry Pendulum

Mounting

The motor and the music box face each other along one bar of extrusion. Everything fixes to it with T-nuts, so either end slides along to line up the shafts.

The motor
On its L-bracket, the bracket's foot on the bar's top slot with two M5 screws and T-nuts, the shaft pointing along the bar.
The music box
Taped to a wooden riser, and the riser screwed to a corner bracket on the bar, so the crank shaft sits level with the motor's and in line with it.
The strip
It runs across the bar, in on one side of the box and out the other. Give it room to fall away on the out side, or a tray to curl into.
The electronics
The driver on the bar just past the music box, on double-sided foam tape, and the board on the bench beside the bar's end, or on the bar if yours is longer. On the Stop Bar, in its box.

Tuning

Tuning

Where the beat falls
The crank locks to the Bridge's beat, but where in each turn the beat falls depends on where the strip sits when you feed it in. With the Bridge playing alongside a click, type offset 90 or offset 180 into the console and listen until the punched notes land on the clicks. Then write the number into the settings at the top of the program.
Turns per beat
One turn a beat suits most tunes at a walking tempo. At a fast tempo the strip rushes through; type turns 0.5 for half a turn a beat, and mark the strip in half turns. At a slow one, turns 2 doubles it.
The driver's current
More current gives more push but warmer parts. A music box needs very little. If the motor misses steps, which you hear as a stumble in the tune, turn the current up a little; if the driver gets too hot to touch, turn it down.

Variations

The Bridge's notes on the strip's notes
The program ignores the Bridge's notes, since the tune is in the strip. A second step is to read them: speed the crank for a moment so a punched note lands on a note from the Bridge. That's the step toward the Windmill Arpeggio Machine, whose wheel turns at the tempo and whose pick plays only the notes it's told.
A wheel of your own
The same motor, driver and program turn anything at the beat. Swap the music box for a wheel with pegs that flick a comb or a ruler.