Skip to content

The Machine · Recipes

Gantry Pendulum #2

Design stage

Updated 2026-10-19

The Gantry pendulum with a second axis. A crosswise rail under the carriage lets the top of the chain move in any direction, so the ball swings forward and back as well as side to side, circles, and strikes four targets in turn.

Loading the model

Drag to turn · scroll to zoom

Printed

3DWhere we started. One version of it: a 40 mm steel ball on a 50 cm chain, two steel plates and two wood blocks, on V-slot wheels. Press Play: the carriages stir the ball into a circle, it strikes all four targets in turn, and they catch it. The swing is simulated from the physics, not drawn by hand. Printed parts are drawn in orange; everything else is bought.

Overview

Cost, roughly
About $330
Printing
About 4 hours
Building
A long weekend
Difficulty
Involved

Anatomy

1
Energy source
The swing of a ball on a chain, in any direction
2
Control
Two stepper-driven carriages, one stacked on the other, move the top of the chain in time with the swing
3
Sounding body
Four targets, one each side; we started with two steel plates and two wood blocks
4
Reset
Each carriage catches its direction of the swing to a stop
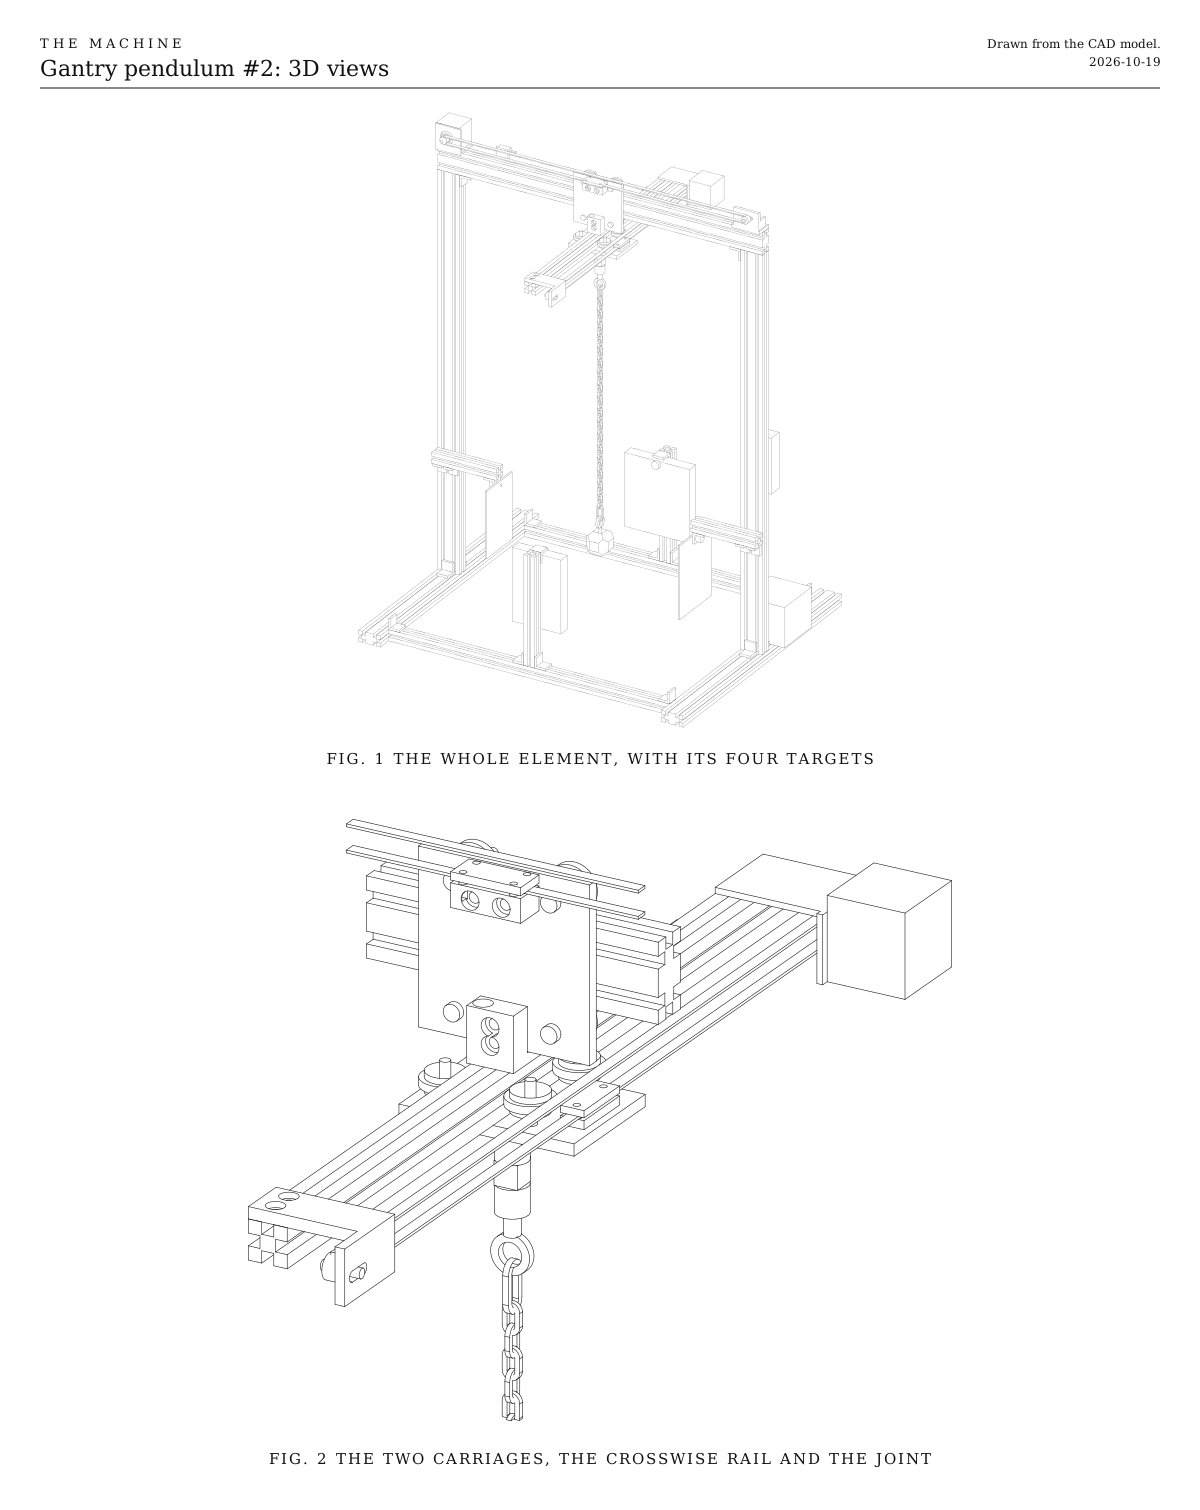
3D views. The whole element with its four targets, and the two carriages up close with the crosswise rail and the universal joint the chain hangs from. Drawn from the CAD model.
Fig. 13D views. The whole element with its four targets, and the two carriages up close with the crosswise rail and the universal joint the chain hangs from. Drawn from the CAD model.

How it works

  • This is the Gantry pendulum with a second axis. The first carriage still rolls along the top bar. It now carries a short crosswise rail, and a second carriage with its own motor rolls along that. The chain hangs from the second carriage on a universal joint, so the top of the chain can go anywhere over the ball. We started with a 40 mm steel ball on a 50 cm chain; the choices below cover the alternatives.
  • Nothing positions the ball. The carriages only move the top of the chain, and the ball follows by swinging. Direction decides when; physics does the playing.
  • The swing keeps the same time in every direction. A ball on a 50 cm chain takes about 1.4 s to swing there and back, whichever way it goes. So a swing can be a straight line in any direction, an ellipse or a circle, and the carriages can turn one into another.
  • Four moves:
    • Rock. Move the top of the chain back and forth in time with the swing, heading one way while the ball is out the other. The swing grows along that line.
    • Stir. Rock both directions a quarter swing apart, so the joint goes round in a small circle. The ball goes round in a big one.
    • Dash. With the ball hanging still, dash the top of the chain toward any target. The ball is left behind, swings after it, and strikes about 0.6 s later.
    • Catch. Each direction of the swing is caught on its own. When the swing in that direction runs out, its carriage slides over the ball and that part of the swing stops. Catch both and the ball hangs dead still.
  • Four targets, one on each side at ball height. We alternated steel and wood around the ring, two sizes of each, so a circling ball plays metal, wood, metal, wood, at four pitches, about a round a second. Each target comes off with a thumb screw, so they can change mid-performance.
  • It plays softly. In a round, the ball meets each target at about half a meter a second, as fast as it would be going if dropped about 1.5 cm. A dash gives about twice that. Targets that ring carry it. For louder, use a heavier ball.
  • Every strike is planned ahead. A strike lands a predictable time after the move that causes it, so the element starts early by that much and the strike lands on the beat.
  • Control: one ESP32 listens for the wireless signal and drives both steppers through quiet drivers. A switch on each axis gives its carriage a known starting point. The second motor rides on the first carriage, so its wires run in a cable chain. It runs from the shared power-tool battery. If it hears nothing for a couple of seconds, it catches the ball and goes quiet; faults show on the board’s light.

Ways to play

  • Aimed strikes: dash toward any one of the four, strike, catch.
  • Rounds: stir the ball into a circle, and it strikes all four in turn, round and round. Stir the other way and the round runs backwards.
  • Back and forth, then turn: rock along one pair of targets, tick and tock, then steer the swing round to the other pair.
  • Swells: rock or stir a little harder each swing, and every strike lands louder than the last.

Before any code: push the carriages by hand in a small circle, in time with the swing, and feel the ball start to circle.

Notes

  • This is a first design, drawn but not yet built. Expect one round of fitting, more than on the Gantry pendulum, because the two carriages are stacked.
  • The swing in the 3D model is simulated from the physics, in both directions at once, with guesses for how much bounce each target gives back. A test build will give the real figures.
  • Costs in the parts list are rough estimates for budgeting, not checked prices. They add up the version we started with.
  • The firmware in the downloads is a first version. It compiles, and the physics it runs is tested against the CAD simulation, but it hasn’t yet run on a built element. It listens for Control, the one broadcast signal every element hears, and until there’s a bridge to send it, its bench console plays the notes.

Parts

Ingredients

KindPartQtySourceEachFile
PrintedBelt clamp for the first carriage1··STL
PrintedIts clamp plate1··STL
PrintedIdler mount on the top bar, slotted to tension the first belt1··STL
PrintedCross block, hangs the crosswise rail under the first carriage1··STL
PrintedBelt clamp for the second carriage1··STL
PrintedIts clamp plate1··STL
PrintedIdler mount on the crosswise rail, slotted to tension the second belt1··STL
PrintedPivot mount, holds the universal joint under the second carriage1··STL
BoughtAluminum extrusion, 20 x 40 mm V-slot, 600 mm, for the top barV-slot has V-shaped grooves along each face. The carriages' wheels roll in them, so the bars are also the rails.1·$12.00
BoughtAluminum extrusion, 20 x 40 mm V-slot, for the legs, about 21 cm longer than the chain (715 mm here)Your choice: see How long it hangs2·$14.00
BoughtAluminum extrusion, 20 x 40 mm V-slot, 500 mm, for the feet2·$10.00
BoughtAluminum extrusion, 20 x 20 mm V-slot, 460 mm, for the crosswise railYour choice: see The rails1·$5.00
BoughtAluminum extrusion, 20 x 20 mm V-slot, 520 mm, for the floor bars at the front and back2·$5.00
BoughtAluminum extrusion, 20 x 20 mm V-slot, 200 mm, for the front and back target posts2·$3.00
BoughtAluminum extrusion, 20 x 20 mm V-slot, 120 mm, for the left and right target arms2·$3.00
BoughtCorner brackets for 20 mm V-slot, with screws and T-nutsFor every joint in the frame, the arms and posts, and one at the top of each arm and post to hold a target.22·$1.00
BoughtV-slot gantry plate for 20 x 40 mm extrusion, about 88 mm square, for the first carriageYour choice: see The railsIt needs two holes midway between the lower wheels for the cross block. Drill 5 mm if they're missing.1·$15.00
BoughtV-slot gantry plate for 20 x 20 mm extrusion, for the second carriageYour choice: see The rails1·$12.00
BoughtSolid V wheels, with bearingsYour choice: see The rails8·$3.00
BoughtWheel spacers, 6 mm, half plain and half eccentricYour choice: see The railsOn each carriage, the eccentric pair sets how hard the wheels grip.8·$1.00
BoughtNEMA 17 stepper motors, 40 mm body2·$12.00
BoughtNEMA 17 L-brackets2·$3.00
BoughtGT2 pulleys, 20 teeth, 5 mm bore, for 6 mm belt2·$2.00
BoughtGT2 idlers, 20 teeth, 5 mm bore2·$2.00
BoughtGT2 belt, 6 mm wide, about 2.2 m in allAbout 1.2 m for the first carriage and 1 m for the second.1·$5.00
BoughtTMC2209 stepper driversQuiet enough that the motors don't whine over the targets.2·$6.00
BoughtCable chain, 10 x 10 mm, about 60 cmCarries the second motor's and switch's wires as the first carriage moves.1·$6.00
BoughtUniversal joint, 8 mm bore at both endsYour choice: see The pivot1·$5.00
BoughtSteel pin, 8 mm, about 25 mm longYour choice: see The pivotA dowel pin. It's pressed into the pivot mount, and the joint's top clamps onto it.1·$1.00
BoughtM8 eye bolt, screwed into the joint's lower endYour choice: see The pivot1·$1.00
BoughtSteel link chain, 2.5 mm wire, cut to length (about 37 cm here)Your choice: see The chain or cord1·$4.00
BoughtQuick links, 3.5 mmOne at each end of the chain, so the ball and the chain both come off in seconds.2·$1.00
BoughtM6 eye boltYour choice: see The ball1·$1.00
BoughtSteel ball, 40 mm, drilled and tapped M6Your choice: see The ball1·$8.00
BoughtSteel plates, about 3 mm thick, one about 140 x 100 mm and one about 130 x 80 mmYour choice: see The targets2·$5.00
BoughtM5 thumb screws, with rubber washers, to hold the targetsYour choice: see How the targets are held4·$1.00
BoughtMicro switches with roller levers, and mounts for 20 mm V-slot2·$3.00
BoughtESP32-S3 development boardThe S3, not the classic ESP32 the Gantry pendulum uses, because two carriages need more pins than a classic one has free.1·$9.00
BoughtBattery adapter for the shared power-tool platform, and a 5 V buck converterBoth stepper drivers run from the battery, through the fuse, the stop button and the relay. The ESP32 takes 5 V.1·$15.00
BoughtThe listener parts every element carries, as on the Control pageA blade fuse holder and fuse (3 A here, for two motors), a latching stop button with a spare contact, the status light, the number switches and their resistors. The stop switch under Choices has a plain two-pole switch in place of the stop button.1Link$12.00
BoughtMomentary push button, normally open, for the test buttonA short press plays each note once, and a long press relearns what the element can by itself. Any small panel button that closes while it's pressed will do.1·$1.00
BoughtRelay module, 5 V, high-level trigger, contacts rated 10 AThe switch both motors' power goes through. As on the Gantry pendulum, it stands in for the MOSFET the Control page also allows, because a MOSFET module switches the ground side, which would leave the stepper drivers grounded only through the ESP32.1·$2.00
BoughtElectrolytic capacitors, 100 µF, 35 VOne across each driver's motor supply, to soak up the spikes the motors send back.2·$1.00
BoughtStranded hookup wire, 22 AWG, about 3 m in four colorsFor the second motor and its switch, whose wires bend every time the first carriage moves. Solid wire breaks there.1·$4.00
BoughtSmall project box, for the electronicsYour choice: see The electronics1·$5.00
BoughtM5 screws, T-nuts and washers, assortedWheels (M5 x 35, and one M5 x 45 for the first carriage's top-left wheel, which presses its home switch), cross block, idlers, motor brackets and idler mounts.1·$8.00
BoughtM3 screws and nuts, and four M3 heat-set inserts1·$3.00
SalvagedHardwood blocks, about 20 mm thick, one about 130 x 90 mm and one about 130 x 120 mmYour choice: see The targetsMaple, oak or scraps of flooring.2··
Total$332.00

Tools

  • 3D printer, PETG
  • Hex keys, 1.5, 2.5, 3 and 4 mm
  • Soldering iron, for the heat-set inserts and the wiring
  • Two pairs of pliers, to open the chain at the right link
  • A drill, for a hole in each target
  • A square, to set the crosswise rail
  • A phone with a stopwatch, to time the swing

Choices

Decisions that are yours to make. Where we started is the version in the 3D model and the ingredients: a starting point, not the right answer.

The ball

What swings into the targets?

Steel ball, 40 mmWhere we started

SoundA hard, bright hit that makes metal ring clearly

About 260 g. Sold drilled and tapped for railings and gear knobs. Dents drum heads and soft wood over time.

Steel ball, 50 mm

SoundThe loudest, with twice the weight behind the same hit

About 510 g. Harder work for both motors when they catch, and harder on the targets.

Rubber ball, about 60 mm

SoundLike a soft mallet, round and warm, with less attack

A lacrosse ball, about 145 g, drilled through for a bolt. Safe on drum heads and gongs.

Hardwood ball, 50 to 60 mm

SoundA warm knock, the quietest of these

Drilled craft balls, 50 to 80 g. Cheap, and the easiest on the motors.

The ball hangs on a quick link, so changing it takes seconds. Keep its middle at the same height, or time the swing again.

The chain or cord

What does the ball hang from?

Steel link chainWhere we started

SoundA small clink from the links on each strike

Looks the part, and doesn't twist. Welded short-link chain hangs straightest.

Thin wire rope

SoundSilent, so you hear only the strike

Doesn't stretch, so timing stays exact. Needs crimped loops at each end.

Braided cord

SoundSilent, and a touch softer on the strike

Cheapest. Stretches a little, which blurs the timing, and twists as the ball circles, so the ball spins.

How long it hangs

How far below the joint is the middle of the ball?

Short, about 30 cm

SoundA quick swing, about 1.1 s there and back, and quicker rounds

A compact frame, about 60 cm tall. Smaller swings.

Medium, about 50 cmWhere we started

SoundAbout 1.4 s a swing; a round of four strikes takes about a second

A frame about 80 cm tall.

Long, 75 cm to 1 m

SoundA slow, stately swing, 1.7 to 2 s, and wide, slow rounds

A frame 1 to 1.3 m tall, which wants to be stiffer, and longer rails.

The length sets the tempo, not the loudness, and it's the same in every direction. The legs are about 21 cm longer than the chain.

The targets

What does the ball strike? There's one on each side, and they needn't match.

Steel platesWhere we started

SoundRings long and bright, like a bell; a smaller plate rings higher

Hardware-store offcuts, 2 to 4 mm thick. We used two sizes, for two notes.

Hardwood blocksWhere we started

SoundA short, dry knock; a bigger block knocks lower

Any dense offcuts. Cut a slot into one, like a temple block, for a hollower voice.

Found metal

SoundEach has its own pitch. Gongs and pot lids shimmer, and a cowbell clanks.

Hang a gong or lid from its rim; a cowbell or tube needs its own holder.

A drum

SoundA thump, with a buzz from the wires on a snare

Rubber ball only. A frame drum stands on edge; a snare or tom goes on its own stand, tilted so the head faces the ball.

We alternated steel and wood around the ring, so a circling ball plays metal, wood, metal, wood. Each target comes off with a thumb screw, so they can change mid-performance.

How the targets are held

Clamped still, or free to swing?

ClampedWhere we started

SoundCrisp strikes that land when expected, and the target still rings

Pinched by a thumb screw between rubber washers. Predictable.

Hung on a cord

SoundThe target swings away, rings freely and comes back on its own schedule

The targets and the ball write the rhythm together, as on the Swinging striker. Less predictable, and that's the point.

The pivot

What does the chain hang from?

A universal jointWhere we started

SoundCircles stay circles, because the swing keeps the same pace in every direction

About $5. Both directions turn about one point, so it's the most predictable. A cheap one can click at the ends of a big swing.

The chain's top link on a hook

SoundCircles slowly lean into ellipses and wander, and the rounds drift

Free and simplest. The two directions pivot at slightly different points, so they keep slightly different time. That drift might be the music.

The rails

What do the two carriages roll on?

V-slot wheelsWhere we started

SoundNearly silent, a soft roll

Cheapest, because the bars are the rails. The wheels need setting, wear over time, and can knock on hard catches if they're loose.

MGN linear rails

SoundA faint hum as their balls roll

About $35 more for both. Stiffer, with no play, which matters most for the crosswise rail hanging from one block. They need printed carriage plates, not drawn yet.

The stop switch

What cuts both motors' power at the element?

Latching emergency-stop button, with a spare contactWhere we started

The red mushroom head anyone nearby knows to hit. It stays down until it's twisted to release, so the element can't start again by accident. Its main contact cuts the power and its spare contact tells the ESP32. About $8.

Two-pole power switch, a rocker or a toggle

Smaller, plainer and cheaper, about $2. One pole cuts the power and the other tells the ESP32, so it does the same job. It doesn't read as a stop to someone who doesn't know the Machine, and it switches back on as easily as off. Rate its contacts above what the element draws, as the button's are.

Keep the second pole either way. The ESP32 knows where the carriages are only by counting the steps it sends, so the second pole is how it learns the power was cut, and finds their home switches again before it moves. Without it, a carriage pushed by hand while the power was off could be driven into the end of its rail. Either way the relay stays, since it's how a stop from the Bridge reaches the element when no one is at it. A two-pole switch wires as the button does: one pole in place of the main contact, from 11 to 12, and the other in place of the spare contact, from 13 to 14.

Print

Material
PETG
Layers
0.2 mm
Walls
4
Infill
40%

Every part fits a 150 mm bed and prints without supports. PETG shrugs off a warm motor and the knock of a catch; PLA is fine for a first try.

The printed parts

  • Belt clamp for the first carriage

    Which way up
    As it sits on the carriage, belt grooves facing up
    Supports
    None
    Time
    About 25 minutes
    STL ↓
  • Its clamp plate

    Which way up
    Flat
    Supports
    None
    Time
    About 10 minutes
    STL ↓
  • Idler mount on the top bar, slotted to tension the first belt

    Which way up
    Base down, with the wall standing up
    Supports
    None
    Time
    About 50 minutes
    STL ↓
  • Cross block, hangs the crosswise rail under the first carriage

    Which way up
    Upright, with the slot for the gantry plate opening upward
    Supports
    None
    Time
    About an hour

    It carries the crosswise rail and the whole swing, so keep the walls at four or more.

    STL ↓
  • Belt clamp for the second carriage

    Which way up
    Flat, belt grooves facing up
    Supports
    None
    Time
    About 10 minutes
    STL ↓
  • Its clamp plate

    Which way up
    Flat
    Supports
    None
    Time
    About 10 minutes
    STL ↓
  • Idler mount on the crosswise rail, slotted to tension the second belt

    Which way up
    Upside down from how it sits, the base on the bed and the wall standing up
    Supports
    None
    Time
    About 45 minutes
    STL ↓
  • Pivot mount, holds the universal joint under the second carriage

    Which way up
    Flat, with the pin hole on the bed so it prints round
    Supports
    None
    Time
    About 35 minutes

    The 8 mm pin is a press fit. If it won't go in, open the hole a little with a drill bit turned by hand.

    STL ↓

Assembly

  1. 1

    Build the first carriage for your rails. On V-slot wheels, fit four wheels to the larger gantry plate, with plain spacers on the upper pair and eccentric spacers on the lower pair. Use the long M5 screw for the top-left wheel; its tail presses the first home switch.

  2. 2

    Put it on the top bar before the legs go on, and turn the eccentric spacers until the lower wheels grip.

    TrickyThe carriage has to go on before the legs do; once they're on, it can't get on or off the bar. Too loose and it knocks on every catch; too tight and the motor stalls.

    CheckIt rolls end to end with no tight spots, and you can't rock it on the bar by hand.

  3. 3

    Build the second carriage the same way on the smaller plate, with its wheels facing up to run in the side slots of the crosswise rail. Slide it onto the rail and set its grip.

    CheckIt rolls the length of the rail with no tight spots.

  4. 4

    Bolt the cross block around the bottom edge of the first gantry plate, between its lower wheels, with two M5 bolts through the plate. Bolt the crosswise rail up into it with two M5 bolts and T-nuts, its long side square to the top bar.

    TrickyThe crosswise rail hangs from one small block, so any slack there becomes a wobble in the swing. Tighten all four bolts hard. A rail that isn't square makes front and back swings lean sideways.

    CheckMeasured with a square against the top bar, the crosswise rail sits at a right angle, and it doesn't flex when you push on its ends.

  5. 5

    Join the feet, legs and top bar with corner brackets into an upside-down U, the top bar sitting on the legs. Bolt the floor bars between the feet at the front and back, and stand a target post in the middle of each. Use two brackets at every joint.

    CheckThe bar is level, the frame doesn't rock on a flat floor, and pushed at the top in any direction, it doesn't sway.

  6. 6

    Fit the first drive as on the Gantry pendulum. Melt the inserts into its belt clamp and bolt the clamp to the front of the first plate. Put the motor, on its L-bracket, on top of the bar at one end and the idler mount at the other. Clamp the belt and tension it at the idler.

    CheckPushed hard by hand, the first carriage turns its motor rather than jumping a tooth.

  7. 7

    Fit the second drive along the crosswise rail. Put the second motor, on its L-bracket, at the rail's back end, and the second idler mount at its front end. Screw the second belt clamp and its plate onto the second carriage, clamp the belt, and tension it at the idler.

    CheckPushed hard by hand, the second carriage turns its motor rather than jumping a tooth.

  8. 8

    Lay the second motor's and switch's wires in the cable chain, from the first carriage to the end of the top bar.

    TrickyThese wires bend every time the first carriage moves. Loose, they break, and usually mid-show. Use stranded wire, and let the cable chain carry every bend.

  9. 9

    Press the 8 mm pin into the pivot mount and bolt the mount under the second carriage. Slide the universal joint's top onto the pin and tighten its set screw, then screw the M8 eye bolt into its lower end.

    TrickyTighten each set screw on a flat filed on the pin, or it slips and the joint slowly turns.

    CheckThe joint swings freely both ways, with no click or catch.

  10. 10

    Hang your ball. Join your chain to the eye bolt with a quick link, and cut it so the middle of the ball hangs at your chosen length below the joint, counting the quick links and the ball's eye bolt. Hang the ball on the lower quick link.

    TrickyThe length sets the tempo, and every timing in the firmware follows from it. Write the real figure down. If the two directions differ, the pivot isn't one point, and circles won't stay round.

    CheckTen swings side to side and ten swings front to back take the same time, about 14 s on a 50 cm chain.

  11. 11

    Bolt the target arms to the front of the legs and set the brackets on the arms and posts at the height that puts the middle of your targets level with the middle of the ball.

  12. 12

    Hold your targets. Drill a hole near the top of each and fix it to its bracket with a thumb screw, with a rubber washer on each side, or hang it on a cord if you chose to let it swing.

    TrickyPinch the rubber just enough to hold the target square. Too tight and it can't ring; too loose and the ball knocks it away.

    CheckTapped, each target rings rather than thuds. Pushed gently, the ball meets each one flat on its face, near the middle.

  13. 13

    Set each target 15 to 25 cm from where the ball hangs at rest, all four at the same distance to start. We started at 18 cm to each face.

  14. 14

    Fit the first home switch to the back of the top bar, where the long wheel screw presses it with the ball still about a centimeter clear of the left target. Fit the second on the side of the crosswise rail near its back end, where the second carriage's wheel presses it with the ball still clear of the back target.

    TrickyBoth switches have to sit inside the targets. Homing drags the ball along under the carriages, so a switch set past a target drags the ball into it. Move the switches whenever you move the targets.

    CheckWith either carriage against its switch, the ball hangs clear of the nearest target.

  15. 15

    Wire it in the box on the leg, following the wire list under Wiring. The fuse comes first, then the 5 V converter for the ESP32, and the stop button and the relay for the motors' power. Each stepper goes to its own driver, and each home switch to its own ESP32 input. Join all the grounds.

    TrickySet the 5 V converter with a multimeter before the ESP32 is connected. Most come set higher, and more than about 6 V destroys the board.

    CheckWith the battery in and no code running, both motors turn freely by hand and the ESP32's light is on. Press the stop button, release it, and nothing moves.

  16. 16

    Load the firmware from the downloads with the Arduino environment for ESP32, and open its serial monitor. Type in the time for ten swings and the gap from the ball to the targets, as its README says.

    TrickyThere's no sensor on the swing. The firmware knows where the ball is only by simulating it from its own moves, so a wrong swing time means strikes off the beat and catches that leave a swing. Time the ten swings carefully.

    CheckIt homes both carriages to their switches slowly and glides to the middle. Typed in, "play 1" strikes the right target a second later, then both carriages catch the ball and glides back.

Wiring

The fuse comes first, right after the battery. The ESP32-S3 runs from the 5 V converter. Both motors' power goes through the stop button and then one relay, so either one cuts it. The second motor and its home switch ride on the first carriage, so their wires run in the cable chain. The status light, the number switches and the battery reading are wired the same way on every element, so they're on the Control page, not here.

Wiring · Gantry Pendulum #2
PowerSignalMotorGround, all joinedPins drawn faint are left empty.

Wire list

  1. Battery adapter, +

    Fuse, 3 A, in

    PowerRed, 16 AWG

    As short as the adapter allows. Nothing connects ahead of the fuse.

  2. Fuse, 3 A, out

    5 V converter, IN+

    PowerRed, 22 AWG

  3. Fuse, 3 A, out

    Stop button, 11

    PowerRed, 18 AWG

  4. Stop button, 12

    Relay module, COM

    PowerRed, 18 AWG

    The stop button's main contact opens when pressed, cutting both motors' power itself, so a program that hangs can't ignore it.

  5. Relay module, NO

    First TMC2209 driver, VM

    PowerRed, 18 AWG

  6. Relay module, NO

    Second TMC2209 driver, VM

    PowerRed, 18 AWG

    Each driver gets its own wire from the relay.

  7. Capacitor, 100 µF, +

    First TMC2209 driver, VM

    PowerThe capacitor's own leg

    Solder its legs straight onto the driver's VM and GND pins. The stripe on its side marks the − leg.

  8. Capacitor, 100 µF, +

    Second TMC2209 driver, VM

    PowerThe capacitor's own leg

  9. 5 V converter, OUT+

    ESP32-S3 board, 5V

    PowerRed, 22 AWG

    Only once the converter is set to 5 V.

  10. 5 V converter, OUT+

    Relay module, VCC

    PowerRed, 22 AWG

  11. ESP32-S3 board, 3V3

    First TMC2209 driver, VDD

    PowerRed, 22 AWG

    The drivers' logic runs at the ESP32's 3.3 V, so their signals match.

  12. ESP32-S3 board, 3V3

    Second TMC2209 driver, VDD

    PowerRed, 22 AWG

  13. Battery adapter, −

    5 V converter, IN−

    GroundBlack, 22 AWG

  14. Battery adapter, −

    First TMC2209 driver, GND

    GroundBlack, 18 AWG

    The motors' return. Use each driver's GND pin next to VM.

  15. Battery adapter, −

    Second TMC2209 driver, GND

    GroundBlack, 18 AWG

  16. Capacitor, 100 µF, −

    First TMC2209 driver, GND

    GroundThe capacitor's own leg

  17. Capacitor, 100 µF, −

    Second TMC2209 driver, GND

    GroundThe capacitor's own leg

  18. 5 V converter, OUT−

    ESP32-S3 board, GND

    GroundBlack, 22 AWG

  19. ESP32-S3 board, GND

    First TMC2209 driver, GND

    GroundBlack, 22 AWG

    Each driver's other GND pin, next to VDD.

  20. ESP32-S3 board, GND

    Second TMC2209 driver, GND

    GroundBlack, 22 AWG

  21. Relay module, GND

    ESP32-S3 board, GND

    GroundBlack, 22 AWG

  22. Resistor, 10 kΩ, 2

    ESP32-S3 board, GND

    GroundThe resistor's own leg

  23. First home switch, COM

    ESP32-S3 board, GND

    GroundBlack, 22 AWG

  24. Second home switch, COM

    ESP32-S3 board, GND

    GroundBlack, stranded 22 AWG, in the cable chain

  25. Stop button, 14

    ESP32-S3 board, GND

    GroundBlack, 22 AWG

  26. Test button, 2

    ESP32-S3 board, GND

    GroundBlack, 22 AWG

  27. ESP32-S3 board, GPIO 16

    First TMC2209 driver, STEP

    SignalAny color, 22 AWG

  28. ESP32-S3 board, GPIO 17

    First TMC2209 driver, DIR

    SignalAny color, 22 AWG

  29. ESP32-S3 board, GPIO 18

    First TMC2209 driver, EN

    SignalAny color, 22 AWG

    Low turns the motor on. The ESP32 holds it high while the element waits, so the motor doesn't hum.

  30. ESP32-S3 board, GPIO 38

    Second TMC2209 driver, STEP

    SignalAny color, 22 AWG

  31. ESP32-S3 board, GPIO 39

    Second TMC2209 driver, DIR

    SignalAny color, 22 AWG

  32. ESP32-S3 board, GPIO 40

    Second TMC2209 driver, EN

    SignalAny color, 22 AWG

  33. ESP32-S3 board, GPIO 5

    Relay module, IN

    SignalAny color, 22 AWG

  34. Resistor, 10 kΩ, 1

    Relay module, IN

    SignalThe resistor's own leg

    Holds the relay off while the ESP32 starts, when its pins float.

  35. First home switch, NC

    ESP32-S3 board, GPIO 21

    SignalAny color, 22 AWG

    Each switch's normally closed contact, which opens when pressed. A broken wire then reads as pressed, so the carriage stops rather than driving into the end.

  36. Second home switch, NC

    ESP32-S3 board, GPIO 41

    SignalAny color, stranded 22 AWG, in the cable chain

  37. Stop button, 13

    ESP32-S3 board, GPIO 4

    SignalAny color, 22 AWG

    The stop button's spare contact, so the ESP32 knows it's been pressed.

  38. Test button, 1

    ESP32-S3 board, GPIO 14

    SignalAny color, 22 AWG

    The test button. The ESP32's own pull-up holds the pin high until it's pressed, so nothing else goes on this pin.

  39. First TMC2209 driver, 1A

    First stepper motor, A1

    MotorThe motor's own cable

    1A and 1B go to one coil, 2A and 2B to the other.

  40. First TMC2209 driver, 1B

    First stepper motor, A2

    MotorThe motor's own cable

  41. First TMC2209 driver, 2A

    First stepper motor, B1

    MotorThe motor's own cable

  42. First TMC2209 driver, 2B

    First stepper motor, B2

    MotorThe motor's own cable

  43. Second TMC2209 driver, 1A

    Second stepper motor, A1

    MotorStranded 22 AWG, in the cable chain

    The second motor rides on the first carriage. Splice its cable to stranded wire that runs in the cable chain, or buy a motor cable long enough to run the whole way.

  44. Second TMC2209 driver, 1B

    Second stepper motor, A2

    MotorStranded 22 AWG, in the cable chain

  45. Second TMC2209 driver, 2A

    Second stepper motor, B1

    MotorStranded 22 AWG, in the cable chain

  46. Second TMC2209 driver, 2B

    Second stepper motor, B2

    MotorStranded 22 AWG, in the cable chain

Get these right

Set the converter first
Most 5 V converters come set higher. Turn its screw with the battery in and a multimeter on its output until it reads 5.0 V, and only then connect the ESP32. More than about 6 V destroys the board.
Finding the motors' coils
Motor wire colors vary by maker. Touch two wires together and turn the shaft by hand; if it suddenly turns stiffly, those two are one coil. If a motor runs backwards, swap the two wires of one coil.
Never unplug a motor with power on
Disconnecting a running stepper can destroy its driver. Press the stop button first.
The cable chain
Six wires ride in it, the second motor's four and the second switch's two. Use stranded wire, leave a little slack at each end, and tie the wires down where they leave the chain, so the bending happens inside it and nowhere else.
The pins
Any free ESP32-S3 pins will do, except 0, 3, 45 and 46, which the board reads as it starts, 19 and 20, which are its USB port, and 35 to 37 on boards with eight megabytes of extra memory (marked R8). GPIO 14 carries the test button, on every element. If you use others, change them at the top of the firmware.

Mounting

Everything fixes to the V-slot frame with T-nuts and screws, so any part can slide to a new place or come off with a hex key. The second motor, its idler and its switch ride on the first carriage with the crosswise rail; everything else wired stays put.

The frame
Corner brackets, two at every joint, with M5 screws into T-nuts in the slots. The floor bars join the feet the same way, and each target post stands on its floor bar.
The first motor
On its L-bracket on top of the bar at the left end, with two M5 screws into T-nuts in the bar's top slot.
The first idler
The printed idler mount sits on top of the bar at the right end, on two T-nuts. The idler slides along its slot to tension the belt.
The crosswise rail
Hangs from the printed cross block, which wraps the bottom edge of the first gantry plate between its lower wheels. Two M5 screws go through the plate, and two more go down into T-nuts in the rail's top slot.
The second motor
On its L-bracket at the back end of the crosswise rail, on two T-nuts in the rail's top slot. It rides with the first carriage.
The second idler
The printed idler mount sits on the front end of the crosswise rail, on two T-nuts, and slides along its slot to tension the belt.
The home switches
The first on a V-slot switch mount on the back face of the top bar, near the first motor. The second on the side of the crosswise rail near its back end. Both slide along their slots, so they can follow the targets when they move.
The joint
The printed pivot mount bolts under the second gantry plate with two M5 screws. The universal joint clamps onto the steel pin pressed into it.
The targets
The left and right arms are short 20 x 20 lengths, held to the front of the legs by two corner brackets each. The front and back targets hang from brackets at the top of the posts.
The cable chain
Along the back of the top bar. One end is fixed to the bar on two T-nuts near the right leg, and the other to the first carriage, so the chain rolls as the carriage moves.
The electronics
On the back of the right leg, about 30 cm up, on two T-nuts. The wires run down the leg's slot to the battery and up it to the bar.
The stop button
In its own housing, on the front of the right leg near the top, where a hand finds it without reaching past the swing.
The battery
The adapter sits on the right foot, behind the leg, on two T-nuts, so the pack slides on and off without moving anything else.
The wires
Clip-in slot covers hold the fixed wires inside the extrusion's slots, out of sight and away from the swing.

The electronics

Hidden in a box, or on show?

Closed boxWhere we started

A small project box, bought or printed, bolted to the leg. Tidy, and safe from a stray ball, but it hides the electronics.

Open plate

The boards on standoffs on a flat plate on the leg, with the wires dressed along the slot. The electronics become part of the look. It wants neat wiring, and nothing guards it from knocks.

DIN rail

A short length of 35 mm DIN rail on T-nuts, with each board in a snap-on holder. It looks like a control panel, and any board comes off with a flick. The holders add a few dollars.

Whichever you pick, keep the stop button on the outside, where anyone can reach it.

Tuning

Tuning

The test button
A short press plays each of its notes once, starting about a second after you let go: a strike at each of the four targets, a swing each way, rounds, then the catch. Hold it for two seconds and it finds both home switches again instead. It works only while the element is resting, with no Bridge in range or with the Bridge holding it silent. While it plays or is stopped, the button does nothing. A stop ends a test at once, and pressing again ends one early. The time for ten swings is still measured by hand, at the console.
A round that sounds lopsided
One strike in every round is louder, or comes late. That target is closer or farther than the others, or the crosswise rail isn't square. Move the target until the round sounds even.
Circles that fade into lines
The two directions keep different time, so a circle leans into an ellipse and then a line. Check that the joint moves freely both ways and the chain isn't twisting. Or keep it, because the drift changes which targets sound.
Strikes that bunch in pairs
Each strike nudges its own direction of the swing, so a round is rarely perfectly even. Rocking a little harder in one direction can even it out. Or leave it uneven, if you like the lilt.
A thud where there should be a ring
The target is pinched too hard, or touching its bracket. Ease the thumb screw. If it still thuds, the ball may be too soft for that target.
A double hit, a quick "ta-dak"
The ball is bouncing straight back into the target. Catch sooner after the strike, or move that target a little farther out.
Strikes too quiet
Rock farther, for example 50 mm either way instead of 35, or move all four targets a little farther out so the ball has more room to gather speed. Past that, use a heavier ball.
Strikes drifting off the beat
The swing time the firmware uses is off. Time ten swings again, in both directions.
The ball keeps swinging after a catch
One direction's catch came too early or too late. Watch which way it's still swinging, and nudge that carriage's catch until the ball hangs still.
A knock or a wobble from the carriages
A knock on each catch means loose wheels; give the eccentric spacers a small turn. A wobble at the end of a hard move means the cross block's bolts have loosened.
A whine under the music
A stepper driver isn't in its quiet mode. Check its settings; the TMC2209 has a near-silent mode for slow moves.

Variations

A ring of six or eight targets
More targets around the ball, on more posts. Steering the swing picks which one sounds, and a circling ball plays them in turn like a short melody. With eight, they sit closer together, so the aim has to be better.
Sensing the swing
Let the ESP32 see the swing instead of predicting it. A small motion sensor (an MPU-6050 board, about $3) on the joint's lower end reads which way the chain leans, in both directions at once. Catches then come out clean even when a strike takes an unexpected amount out of the swing, and rounds stay locked to the beat. Its wires run down the joint and need to flex.
A square frame with a bridge
Instead of stacking the carriages, a square top frame with a bridge rolling along two sides and the carriage rolling along the bridge, as on a big CNC router. It's stiffer, and nothing hangs from one block, but it needs more extrusion and either two motors or a shaft to keep the bridge square.
CoreXY
Both motors stay fixed on the frame, and two crossed belts move one light carriage, as on many 3D printers. Neither motor rides along, so dashes and catches get crisper. The belt routing is fiddly, and each motor alone moves the carriage on a diagonal.
A rigid arm instead of a chain
A light rod clamped in the joint's lower end. It can push as well as pull, so the moves get crisper, and it never clinks. It also stops being a ball and chain.