Skip to content

The Machine · Recipes

Jar Flipper

Design stage

Updated 2026-10-20

Three jars of gravel, rice and beads ride on one shaft. A stepper flips them half a turn on the beat, and the sound is the fill landing, on the lid one time and on the glass base the next.

Loading the model

Drag to turn · scroll to zoom

Printed

3DWhere we started. This is one version of it, with three 250 ml glass jars a third full of gravel, rice and plastic beads, on one shaft turned through a belt. Press Play to see four quick flips on the beat, each fill dropping as the jars stop, then two slow tips that pour. The glass is drawn with a window front and back so the fill shows. Printed parts are drawn in orange; everything else is bought.

Overview

Cost, roughly
About $180
Printing
About 3.5 hours, in four parts
Building
A weekend
Difficulty
Moderate

Anatomy

1
Energy source
A stepper motor, through a 2 to 1 belt
2
Control
When each half turn starts, and how fast it turns, which sets how loud the landing is
3
Sounding body
Three glass jars, each about a third full of loose fill
4
Reset
None needed. Every flip leaves the jars standing, just the other way up
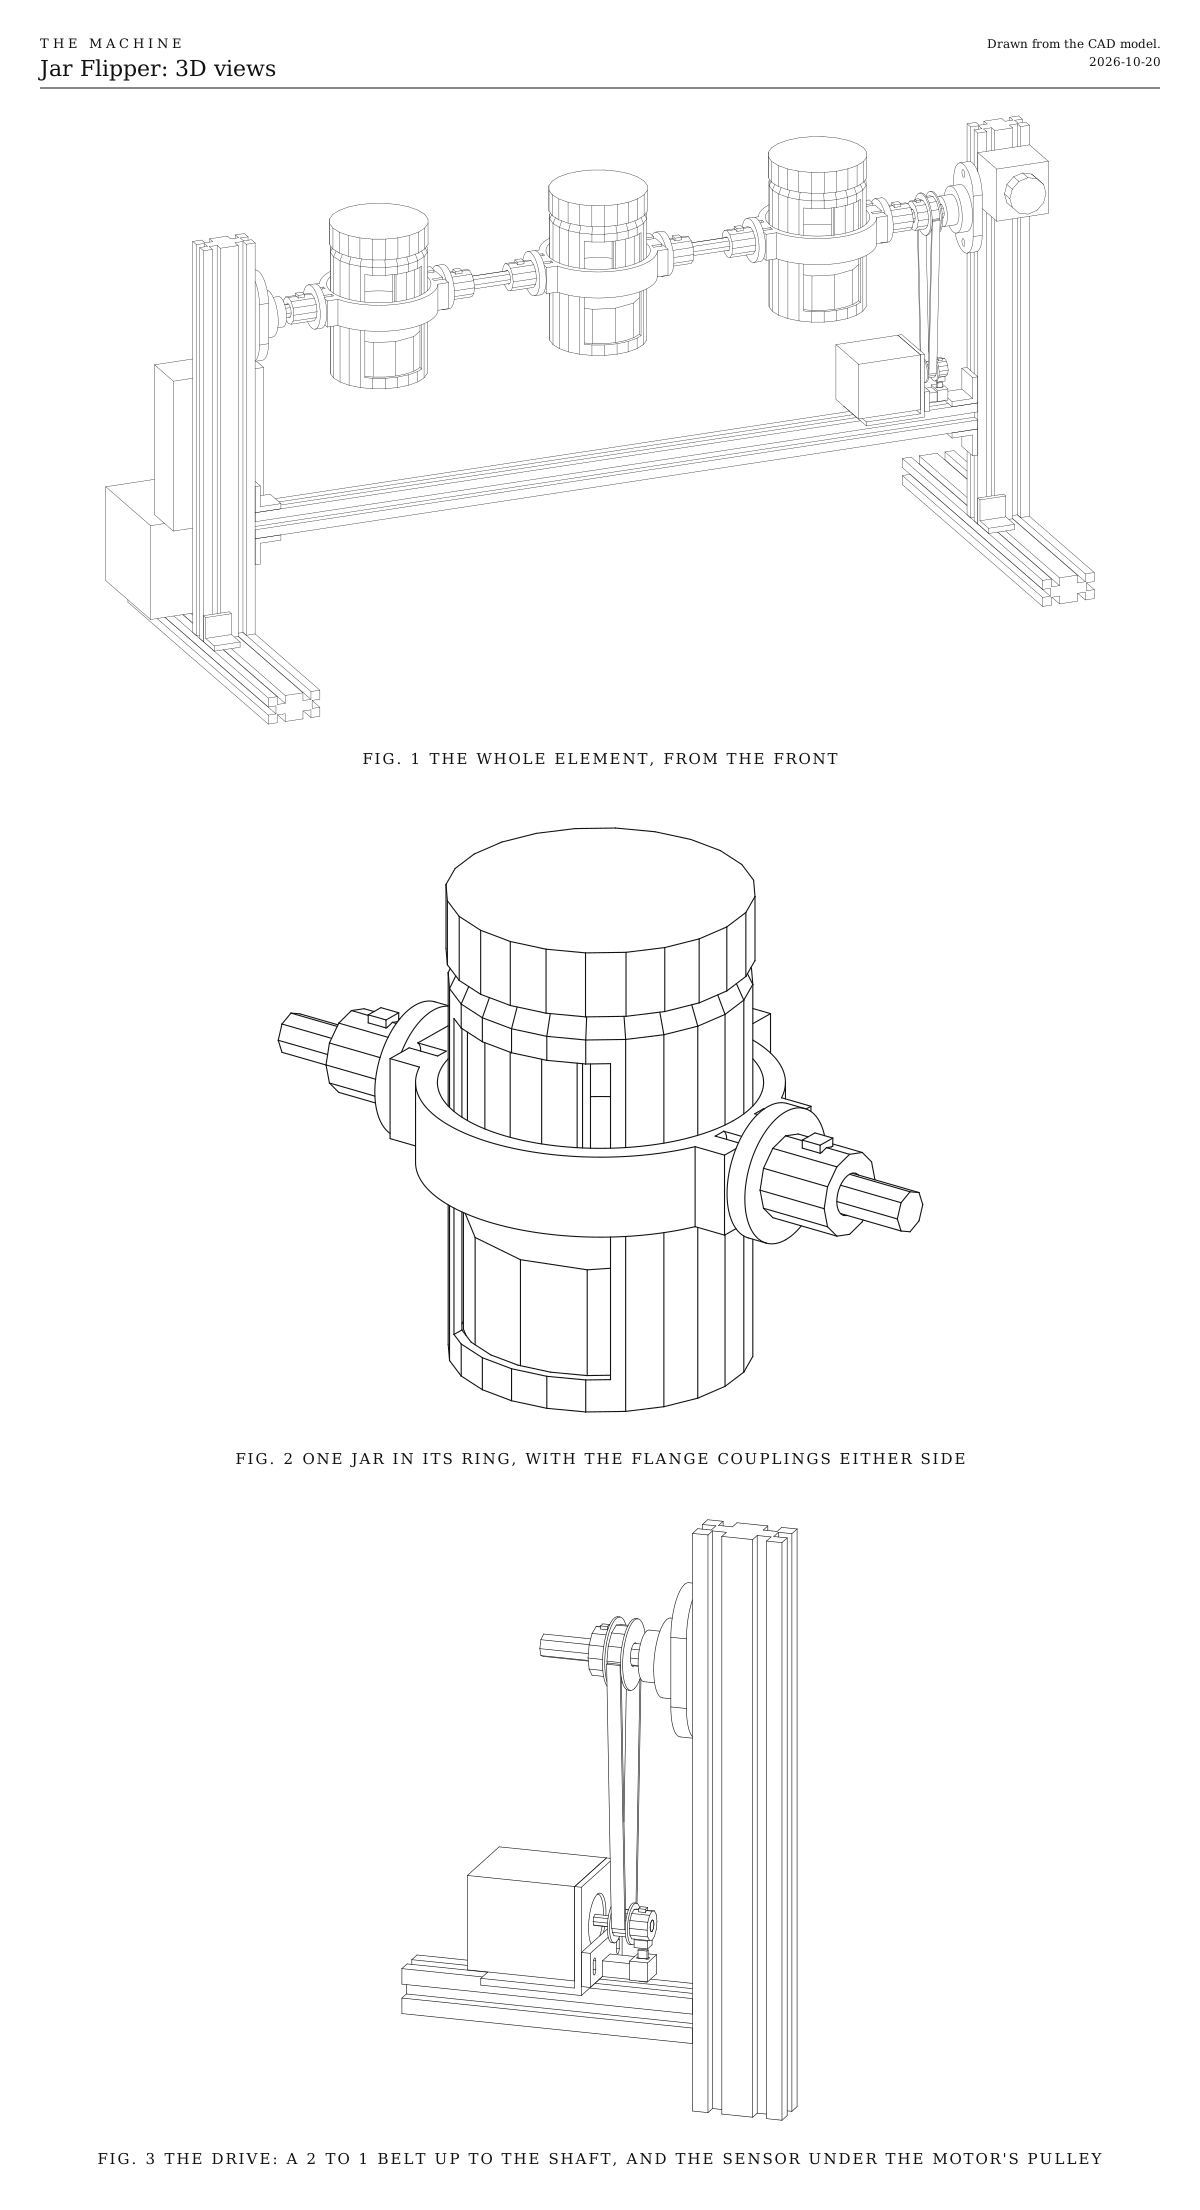
3D views. It shows the whole element from the front, one jar in its ring, and the belt from the motor up to the shaft with the sensor under the motor's pulley. All three views are drawn from the CAD model.
Fig. 13D views. It shows the whole element from the front, one jar in its ring, and the belt from the motor up to the shaft with the sensor under the motor's pulley. All three views are drawn from the CAD model.

How it works

  • Three glass jars, each about a third full, sit side by side on one horizontal shaft, held at their middles by printed rings. We started with gravel, rice and plastic beads, one in each jar. The choices below cover the alternatives.
  • The sound is the landing. A stepper turns the shaft half a turn, always the same way round. The jars stop upside down, and the fill drops from one end to the other. Nothing is struck; the fill is the striker.
  • It ticks and tocks. After every flip the jar is the other way up, so the fill lands on the metal lid one time and on the glass base the next. The lid sounds thin and bright, and the base sounds fuller.
  • It starts early, so it lands on time. A quick flip takes about 0.28 s. While it turns, the spin presses the fill into the far end of the jar, and it only lets go as the jar nearly stops. Then it falls about 63 mm, which takes another 0.11 s. So each flip starts about 0.39 s before its beat. The shared signal sends every step about a second ahead, so there’s time.
  • How it flips sets how loud it is. A quick flip is the loud note, one clean hit. A slow tip of about a second lets the fill pour as the jar passes 125 degrees, a softer wash like a rain stick. A part turn that stops short of the pour and rocks back makes the fill shuffle without falling, a whisper.
  • The belt doubles the motor’s strength. Three jars of glass and fill are about as much as a 48 mm NEMA 17 can flip in a quarter second. A 2 to 1 belt lets the motor spin twice as fast as the jars, where it’s stronger for the work.
  • It knows where the jars are. A magnet on the motor’s pulley passes a hall sensor at every rest. On start, the code turns the jars until it sees the magnet, and from then on it checks every flip finished where it should.
  • An ESP32-S3 listens for the shared wireless signal and drives the stepper through a quiet driver. It runs from the shared power-tool battery.

Ways to play

  • Play on the beat. Each step is one quick flip, with the lid and base trading off.
  • Mix loud and soft. Each step’s loudness from the signal picks a quick flip, a slow tip or a part-turn whisper.
  • Rest. The jars just stand still. Gravity holds them, since the fill is at the bottom.
  • Mind the speed. Each flip needs about 0.4 s before the next can start, so one shaft plays about two notes a second. That’s quarter notes up to about 120 beats a minute, or eighths up to about 60. The code skips any step that comes before the last fill has landed.

Notes

  • This is a first design. Expect one round of fitting.
  • The fill’s fall in the 3D model follows gravity, with the fill drawn as one lump. Real fill spreads out a little as it falls, which is part of the sound.
  • The jars in the model are a generic jar 70 mm across and 115 mm tall with its lid on. Measure yours before printing the rings; the size is at the top of the CAD script.
  • The firmware in the downloads is a first version. It compiles, and its timing is tested on a computer, but it hasn’t yet run on a built element. It listens for Control, the one broadcast signal every element hears, and until there’s a bridge to send it, its bench console plays the notes.
  • Costs in the parts list are rough estimates for budgeting, not checked prices. They add up the version we started with.

Parts

Ingredients

KindPartQtySourceEachFile
PrintedJar ring, grips a jar round its middle and carries a flange coupling on each side3··STL
PrintedSensor arm, holds the hall sensor under the motor's pulley1··STL
BoughtGlass jar, about 250 ml, with a lidYour choice: see The jars3·$2.00
BoughtAquarium or pea gravel, washedYour choice: see What goes in the jars1·$3.00
BoughtRiceYour choice: see What goes in the jars1·$2.00
BoughtPlastic pony beads or 6 mm airsoft BBsYour choice: see What goes in the jars1·$4.00
BoughtSelf-adhesive rubber strip, about 2 mm thick and 20 mm wideIt lines the rings, so the glass is held without a hard point anywhere.1·$3.00
BoughtSteel rod, 10 mm, 300 mm longChrome-plated linear rod is straight and hard. Cut into four: about 50 mm from the left bearing to the first ring, two of about 75 mm between the rings, and about 70 mm from the last ring through the pulley to the right bearing. Some sellers cut to length.1·$6.00
BoughtFlange bearing, KFL000 (two-bolt, 10 mm bore)2·$3.00
BoughtRigid flange coupling, 10 mm boreThere are two on each ring, joining it to the rods either side.6·$4.00
BoughtNEMA 17 stepper motor, 48 mm bodyYour choice: see The motor1·$14.00
BoughtNEMA 17 L-bracket1·$3.00
BoughtGT2 pulley, 20 teeth, 5 mm bore, for 6 mm belt1·$3.00
BoughtGT2 pulley, 40 teeth, 10 mm bore, for 6 mm beltCheck the bore. 8 mm is more common in shops, and won't fit the rod.1·$6.00
BoughtGT2 closed belt loop, 300 mm, 6 mm wideIt's a closed loop, not belt cut from a reel. Its length sets the motor's height, about 120 mm below the shaft.1·$3.00
BoughtHall effect switch, A3144 or similar, the bare three-leg part, with a 6 x 3 mm neodymium magnet1·$1.00
BoughtTMC2209 stepper driverIt's quiet enough that the motor doesn't whine over the fill.1·$6.00
BoughtElectrolytic capacitor, 100 µF, 35 VIt goes across the driver's motor supply, to soak up the spikes the motor sends back.1·$1.00
BoughtESP32-S3 development board1·$8.00
BoughtBattery adapter for the shared power-tool platform, and a 5 V buck converterThe stepper driver runs from the battery, through the fuse, the stop button and the relay. The ESP32 and the hall sensor take 5 V.1·$15.00
BoughtThe listener parts every element carries, as on the Control pageThese are a blade fuse holder and 2 A fuse, a latching stop button with a spare contact, the status light, the number switches and their resistors. The stop switch under Choices has a plain two-pole switch in place of the stop button.1Link$12.00
BoughtMomentary push button, normally open, for the test buttonA short press plays each note once, and a long press relearns what the element can by itself. Any small panel button that closes while it's pressed will do.1·$1.00
BoughtRelay module, 5 V, high-level trigger, contacts rated 10 AIt's the switch the motor's power goes through. It stands in for the MOSFET the Control page also allows, because a MOSFET module switches the ground side, which would leave the stepper driver grounded only through the ESP32.1·$2.00
BoughtSmall project box, for the electronicsYour choice: see The electronics1·$5.00
BoughtAluminum extrusion, 20 x 40 mm V-slot, 300 mm, for the posts2·$6.00
BoughtAluminum extrusion, 20 x 40 mm V-slot, 260 mm, for the feet2·$5.00
BoughtAluminum extrusion, 20 x 20 mm V-slot, 560 mm, for the cross bar under the motor1·$7.00
BoughtCorner brackets for 20 mm V-slot, with screws and T-nutsTwo join each post to its foot, and two hold each end of the cross bar.8·$1.00
BoughtM5 screws, T-nuts and washers, assortedThe bearings, the motor bracket, the electronics box, the stop button and the battery adapter.1·$6.00
BoughtM3 and M4 screws and nuts, and heat-set insertsTwenty-four M4 inserts for the rings' pads. M4 screws for the flange couplings and the ring clamps; M3 screws for the motor.1·$6.00
Total$183.00

Tools

  • 3D printer, PETG
  • Hex keys, 2, 2.5, 3 and 4 mm
  • Soldering iron, for the heat-set inserts and the wiring
  • A hacksaw and a file, for the rod, unless it comes cut
  • A multimeter, to set the 5 V converter
  • A funnel, for the fill
  • A computer with a USB cable, to load the firmware
  • A phone, to film the landings with sound

Choices

Decisions that are yours to make. Where we started is the version in the 3D model and the ingredients: a starting point, not the right answer.

What goes in the jars

What rattles inside? Each jar can hold something different.

Aquarium or pea gravel, 3 to 8 mmWhere we started

SoundA gritty crunch with a low rumble under it, the loudest of these

It's cheap and heavy. Wash the dust out first, or it clouds the glass. Over months it scratches the glass a little.

RiceWhere we started

SoundA soft, fine hiss, the classic shaker sound

Light, so it's quiet. It picks up damp and clings to the glass, which smears the landing.

Plastic beads or 6 mm airsoft BBsWhere we started

SoundA bright, clean click

Round beads flow freely and fall together, so they land the most precisely on the beat. They're light and kind to the glass.

Dried lentils or beans

SoundA rounder, woody chk, between rice and gravel

Lentils slide as one sheet and land together. Beans tumble and spread the landing out.

All three jars flip together, so their fills blend into one sound. Gritty, soft and bright at once is where we started. Seeds such as millet give a whisper like a rain stick. Steel BBs are bright and loud, but heavy on the motor and hard on glass. Rocks give a few separate clacks rather than a shake, and can crack glass, so put them in a plastic jar.

How full

How much fill goes in each jar?

A quarter

SoundThe crispest landing, a little quieter

The fill falls farthest, so it lands hardest for its weight, but there's less of it.

A thirdWhere we started

SoundA full landing that's still one clean hit

It's light enough for the motor to flip all three in about a quarter of a second.

A half

SoundLouder, but the landing smears into a wash

It falls a shorter way, and the extra weight slows the flip and adds to the delay before the beat.

The jars

What holds the fill?

Glass jars, about 250 ml, with metal lidsWhere we started

SoundBright, with a ring to the glass. The lid end ticks and the base end tocks.

Half-pint canning jars are cheap and everywhere, and you can see the fill. Glass is heavy for its size, so three is about what one motor flips quickly.

Small glass jelly jars, about 120 ml

SoundHigher, shorter and quieter

They're light, so the flips are faster and the motor barely works. The fill falls only about 40 mm, so the hit is softer.

Plastic jars

SoundDuller and drier, more rattle than ring

They're light and unbreakable, so they suit rocks and steel. The lid and base sound more alike.

Tins or cardboard tubes, capped at both ends

SoundTins are tinny and bright. Card is warm and earthy.

Both ends sound the same, so the tick and tock goes. Tubes longer than about 150 mm want a stronger motor.

The rings are sized to the jar. JAR_D at the top of the CAD script sets them, and the clamp takes up a few millimeters either way.

The motor

What turns the jars?

NEMA 17 stepper, 48 mm body, through a 2 to 1 beltWhere we started

SoundA faint hum on a TMC2209 driver, and a soft whirr as it flips

Holds the timing exactly, straight from the shared clock. The belt doubles its strength at the speed a flip needs. A magnet on the motor's pulley passes a hall sensor at every rest, so the code knows the jars are standing.

NEMA 23 stepper, through the same belt

SoundMuch the same, a little louder

It suits pint jars, more jars or heavier fill. It's bigger and needs a bigger bracket, and a driver that can give it more current.

A hobby servo for each jar

SoundA buzzy whine on each flip

It's cheap, and each jar gets its own rhythm. A servo turns only about 160 degrees, so the jars tip back and forth instead of round, which is still enough to pour. A flip takes about half a second, so the delay before the beat is longer.

The stop switch

What cuts the motor's power at the element?

Latching emergency-stop button, with a spare contactWhere we started

The red mushroom head anyone nearby knows to hit. It stays down until it's twisted to release, so the element can't start again by accident. Its main contact cuts the power and its spare contact tells the ESP32. About $8.

Two-pole power switch, a rocker or a toggle

Smaller, plainer and cheaper, about $2. One pole cuts the power and the other tells the ESP32, so it does the same job. It doesn't read as a stop to someone who doesn't know the Machine, and it switches back on as easily as off. Rate its contacts above what the element draws, as the button's are.

Keep the second pole either way. The ESP32 knows where the jars are only by counting the steps it sends, so the second pole is how it learns the power was cut, and finds upright again before it moves. Without it, jars turned by hand while it was off would flip from the wrong place. Either way the relay stays, since it's how a stop from the Bridge reaches the element when no one is at it. A two-pole switch wires as the button does: one pole in place of the main contact, from 11 to 12, and the other in place of the spare contact, from 13 to 14.

Print

Material
PETG
Layers
0.2 mm
Walls
4
Infill
40%

Every part fits a 150 mm bed and prints without supports. Print one ring first and try it on your jar with the rubber strip in. The jar should slide in with a push, and close up firmly before the ears touch.

The printed parts

  • Jar ring, grips a jar round its middle and carries a flange coupling on each side× 3

    Which way up
    Flat, as it sits round an upright jar
    Supports
    None
    Time
    About an hour

    Four M4 heat-set inserts go into each pad. An M4 nut sinks into one ear for the clamp screw.

    STL ↓
  • Sensor arm, holds the hall sensor under the motor's pulley

    Which way up
    Its foot flat on the bed, with the arm standing up
    Supports
    None
    Time
    About 15 minutes
    STL ↓

Assembly

  1. 1

    Join each post to its foot with two corner brackets, one in front and one behind, with the post's wide face toward the audience.

  2. 2

    Fit the cross bar between the posts, its underside about 93 mm above the floor, with one bracket above and one below at each end. Leave the brackets loose for now. The belt's tension sets the bar's height later.

    CheckThe frame stands square and doesn't rock on a flat floor.

  3. 3

    Melt four heat-set inserts into each pad of each ring, then line each ring's inside with rubber strip.

  4. 4

    Slide a ring onto each jar to its middle, with the ears at the back, and tighten its clamp screw until the jar can't turn or slide in it.

    TrickyGlass cracks under a hard point. Tighten only until the jar stops slipping, and never without the rubber strip in the ring.

    CheckHold the empty jar with its lid on by the two pads, like an axle. It should hardly want to turn. If it swings base down, slide the ring a few millimeters toward the base.

  5. 5

    Screw a flange coupling onto each pad, four M4 screws each.

  6. 6

    Build the shaft on the bench. Push the rods into the couplings between the jars, then the 40-tooth pulley and the belt loop onto the last rod, and a bearing onto each end. We started with the jars 170 mm apart.

    TrickyFit the belt loop now. Once both bearings are bolted on, a closed loop can't get past them.

    CheckLaid across two books by its bearings, the shaft is straight and the jars turn together without a wobble.

  7. 7

    Lower the shaft between the posts and bolt each bearing to a post's inner face, its middle 260 mm above the floor, with two T-nuts in the slot.

    TrickyThe shaft fits between the posts with no room to spare. Loosen one foot's brackets so its post can lean out a few millimeters, lower the shaft in, then square the post again. Line the two bearings up level, or the shaft binds at one point in each turn.

    CheckTurned by hand, all three jars go round freely and stop wherever you leave them.

  8. 8

    Screw the sensor arm's foot under the motor's two lower screws, on the front of the L-bracket's face. Bolt the motor to the bracket, shaft pointing right, and fit the 20-tooth pulley with its hub toward the post.

  9. 9

    Seat the bracket on top of the cross bar under the shaft pulley, so the two pulleys line up, and slip the belt over the motor's pulley.

  10. 10

    Push the cross bar down until the belt is taut, and tighten its four brackets.

    TrickyToo loose, the belt jumps a tooth on a hard stop and every flip after it is off. Too tight, it wears the motor's bearing. Check the pulleys are in line by eye from above. A belt that runs at an angle walks off a flange.

    CheckPressed halfway between the pulleys, the belt gives about 3 mm. Plucked, it hums a low note.

  11. 11

    With the jars upright, push the hall sensor's legs down through the arm's seat, and glue the magnet to the underside of the motor pulley's hub, right over the sensor, beside the set screw if that's where it is.

    TrickyThe A3144 answers to one pole of the magnet only. Test the magnet against the sensor before gluing it, and flip it if the sensor doesn't switch.

    CheckWith the sensor wired, its output drops low as the magnet passes, once each flip.

  12. 12

    Take each jar's lid off where it stands, pour in its fill to about a third, and screw the lid back on tight.

  13. 13

    Wire it in the box on the back of the left post, following the wire list under Wiring. The fuse comes first, then the 5 V converter for the ESP32 and the sensor, and the stop button and the relay for the motor's power. Join all the grounds.

    TrickySet the 5 V converter with a multimeter before the ESP32 or the sensor is connected. Most come set higher, and more than about 6 V destroys the board.

    CheckWith the battery in and no code running, the jars turn by hand and the ESP32's light is on. Press the stop button, release it, and nothing moves.

  14. 14

    Load the firmware from the downloads with the Arduino environment for ESP32, and open its serial monitor at 115200 baud, as its README says. It turns the jars slowly until it finds upright. Then type play 1 for a quick flip, play 2 for a slow tip and play 3 for a whisper.

    TrickyIf the jars stop a little short or past upright, the motor is skipping steps under the load. The firmware notices and finds upright again, but every miss loses a note. Lengthen the flip with set quick 0.32, raise the driver's current a little, or use less fill. Find the quickest flip that never skips, and keep a little margin below it.

    CheckThe jars stand straight once it has found upright. Each quick flip ends with one clean landing, and after a dozen flips they still stop exactly upright.

  15. 15

    Film the jars with sound, and measure from the moment they start to turn to the moment the fill lands. That's the lead the firmware starts each flip by. Type it in with set lead quick and your figure in milliseconds, do the same for a tip and a whisper, and type save.

    CheckPlayed to the bridge's beat, the landings sit on it.

Wiring

The fuse comes first, right after the battery. The ESP32-S3 and the hall sensor run from the 5 V converter. The motor's power goes through the stop button and then the relay, so either one cuts it. The status light, the number switches and the battery reading are wired the same way on every element, so they're on the Control page, not here.

Wiring · Jar Flipper
PowerSignalMotorGround, all joinedPins drawn faint are left empty.

Wire list

  1. Battery adapter, +

    Fuse, 2 A, in

    PowerRed, 16 AWG

    Keep it as short as the adapter allows. Nothing connects ahead of the fuse.

  2. Fuse, 2 A, out

    5 V converter, IN+

    PowerRed, 22 AWG

  3. Fuse, 2 A, out

    Stop button, 11

    PowerRed, 18 AWG

  4. Stop button, 12

    Relay module, COM

    PowerRed, 18 AWG

    The stop button's main contact opens when pressed, cutting the motor's power itself, so a program that hangs can't ignore it.

  5. Relay module, NO

    TMC2209 driver, VM

    PowerRed, 18 AWG

  6. Capacitor, 100 µF, +

    TMC2209 driver, VM

    PowerThe capacitor's own leg

    Solder the capacitor's legs straight onto the driver's VM and GND pins. The stripe on its side marks the − leg.

  7. 5 V converter, OUT+

    ESP32-S3 board, 5V

    PowerRed, 22 AWG

    Connect it only once the converter is set to 5 V.

  8. 5 V converter, OUT+

    Relay module, VCC

    PowerRed, 22 AWG

  9. 5 V converter, OUT+

    Hall sensor, VCC

    PowerRed, in a three-core cable to the sensor

    The A3144 needs at least 4.5 V, so the sensor takes 5 V, not 3.3 V.

  10. ESP32-S3 board, 3V3

    TMC2209 driver, VDD

    PowerRed, 22 AWG

    The driver's logic runs at the ESP32's 3.3 V, so their signals match.

  11. Battery adapter, −

    5 V converter, IN−

    GroundBlack, 22 AWG

  12. Battery adapter, −

    TMC2209 driver, GND

    GroundBlack, 18 AWG

    The motor's return. Use the driver's GND pin next to VM.

  13. Capacitor, 100 µF, −

    TMC2209 driver, GND

    GroundThe capacitor's own leg

  14. 5 V converter, OUT−

    ESP32-S3 board, GND

    GroundBlack, 22 AWG

  15. ESP32-S3 board, GND

    TMC2209 driver, GND

    GroundBlack, 22 AWG

    The driver's other GND pin, next to VDD.

  16. Relay module, GND

    ESP32-S3 board, GND

    GroundBlack, 22 AWG

  17. Resistor, 10 kΩ, 2

    ESP32-S3 board, GND

    GroundThe resistor's own leg

  18. Stop button, 14

    ESP32-S3 board, GND

    GroundBlack, 22 AWG

  19. Test button, 2

    ESP32-S3 board, GND

    GroundBlack, 22 AWG

  20. Hall sensor, GND

    ESP32-S3 board, GND

    GroundBlack, in the sensor's cable

  21. Hall sensor, OUT

    ESP32-S3 board, GPIO 21

    SignalAny color, in the sensor's cable

    The sensor pulls the pin low as the magnet passes. Turn on the ESP32's own pull-up for this pin.

  22. Stop button, 13

    ESP32-S3 board, GPIO 4

    SignalAny color, 22 AWG

    It's the stop button's spare contact, so the ESP32 knows it's been pressed.

  23. Test button, 1

    ESP32-S3 board, GPIO 14

    SignalAny color, 22 AWG

    The test button. The ESP32's own pull-up holds the pin high until it's pressed, so nothing else goes on this pin.

  24. ESP32-S3 board, GPIO 16

    TMC2209 driver, STEP

    SignalAny color, 22 AWG

  25. ESP32-S3 board, GPIO 17

    TMC2209 driver, DIR

    SignalAny color, 22 AWG

  26. ESP32-S3 board, GPIO 18

    TMC2209 driver, EN

    SignalAny color, 22 AWG

    Low turns the motor on. The ESP32 holds it high while the element is stopped.

  27. ESP32-S3 board, GPIO 5

    Relay module, IN

    SignalAny color, 22 AWG

  28. Resistor, 10 kΩ, 1

    Relay module, IN

    SignalThe resistor's own leg

    Holds the relay off while the ESP32 starts, when its pins float.

  29. TMC2209 driver, 1A

    Stepper motor, A1

    MotorThe motor's own cable

    1A and 1B go to one coil, 2A and 2B to the other.

  30. TMC2209 driver, 1B

    Stepper motor, A2

    MotorThe motor's own cable

  31. TMC2209 driver, 2A

    Stepper motor, B1

    MotorThe motor's own cable

  32. TMC2209 driver, 2B

    Stepper motor, B2

    MotorThe motor's own cable

Get these right

Set the converter first
Most 5 V converters come set higher. Turn its screw with the battery in and a multimeter on its output until it reads 5.0 V, and only then connect the ESP32 and the sensor. More than about 6 V destroys the board.
Use the bare sensor, not a module
Hall sensor modules usually add their own pull-up resistor to their supply, which would put 5 V on the ESP32's pin and can destroy it. The bare three-leg A3144 only ever pulls the pin down, so it's safe on 5 V.
Set the driver's current
Set the TMC2209's current to the motor's rating, often about 1.5 A for a 48 mm NEMA 17. Too little and the quick flips skip steps; too much and the motor runs hot.
Finding the motor's coils
Motor wire colors vary by maker. Touch two wires together and turn the shaft by hand; if it suddenly turns stiffly, those two are one coil. If the jars flip toward the back instead of the audience, swap the two wires of one coil.
Never unplug the motor with power on
Disconnecting a running stepper can destroy its driver. Press the stop button first.
The pins
Any free ESP32-S3 pins will do, except 0, 3, 45 and 46, which the board reads as it starts, 19 and 20, which are its USB port, and 35 to 37 on boards with eight megabytes of extra memory (marked R8). The pins here leave 1 and 6 to 15 free for the status light, the number switches, the test button and the battery reading. If you use others, change them at the top of the firmware.

Mounting

Everything fixes to the V-slot frame with T-nuts and screws, so any part can slide to a new place or come off with a hex key. The shaft and its jars come out as one piece, two bearings and all.

The frame
Two posts of 20 x 40 mm V-slot stand on two feet, with their wide faces to the audience. A 20 x 20 mm cross bar between them carries the motor.
The shaft
It turns in two flange bearings, one on each post's inner face, each held by two T-nuts in the slot. Their height sets the shaft's, 260 mm up where we started. Anywhere the jars clear the cross bar works.
The jars
Each hangs on the shaft by its ring's two flange couplings. They slide along the rods to any spacing before the couplings are tightened.
The motor
It sits on an L-bracket on top of the cross bar, under the shaft's pulley. The cross bar slides up and down the posts, which is how the belt is tensioned.
The hall sensor
It sits on the printed arm under the motor's pulley, held by the motor's own lower screws. It moves with the motor, so tensioning the belt doesn't change its gap.
The electronics
The box sits on the back of the left post, below the bearing, on two T-nuts. The motor and sensor cables run to it along the cross bar's back slot.
The stop button
It sits in its own housing on the front of the right post near the top, where a hand finds it without reaching past the jars.
The battery
The adapter sits on the left foot, behind the post, so the pack slides on and off without moving anything else.

The electronics

Hidden in a box, or on show?

Closed boxWhere we started

A small project box, bought or printed, bolts to the post. It's tidy and protected, but it hides the electronics.

Open plate

The boards sit on standoffs on a flat plate on the post, with the wires dressed along the slot. The electronics become part of the look. It wants neat wiring, and nothing guards it from knocks.

DIN rail

A short length of 35 mm DIN rail goes on T-nuts, with each board in a snap-on holder. It looks like a control panel, and any board comes off with a flick. The holders add a few dollars.

Whichever you pick, keep the stop button on the outside, where anyone can reach it.

Tuning

Tuning

The test button
A short press plays each of its notes once, starting about a second after you let go: a flip chosen by loudness, then a quick flip, a slow tip and a whisper. Hold it for two seconds and it finds upright again instead. It works only while the element is resting, with no Bridge in range or with the Bridge holding it silent. While it plays or is stopped, the button does nothing. A stop ends a test at once, and pressing again ends one early. The leads are still measured from a slow-motion video, at the console.
Landings early or late against the beat
The lead is off. It's the flip plus the fill's fall, about 0.39 s for these jars, and it changes with the fill, how full, and how fast the flip is. Measure it again from a recording after any change, and type it in with set lead.
A smear instead of a hit
The fill is pouring before the jar has stopped. Flip faster, use a fill that flows, such as beads, or put in a little less. A slow tip smears on purpose, so check the flip is really the quick one.
Lid and base sound too alike
That's mostly the fill, since fine fills hide the difference. For more contrast, stick a felt disc inside each lid, so the lid end thuds and the base end rings.
A double landing
The jars bounce back a few degrees at the stop, and the fill shifts twice. The belt's spring does it. Ease the last part of each flip, or tension the belt a little more.
The glass rings on after the hit
Some ring is the sound of glass, and it's nice. If it's too much, slip a wide rubber band round each jar, below the ring.
Rice that clings and smears
The rice has picked up damp. Dry it in a low oven, or swap to beads in a damp room.
The flips drift off the beat
The motor is losing steps. The hall sensor sees the magnet at every rest, so the code can notice a miss and correct the next flip. Then find the cause, which is usually a loose belt, too little current or a flip that's too quick.
A hum between flips
The driver is holding the jars at full current. With the fill at the bottom, the jars stand on their own, so the TMC2209's hold current can drop to a small fraction while it waits.
The frame rocks at each stop
Three jars stopping together push the frame back and forth. Spread the feet farther, bolt them down, or ease the last part of each flip.

Variations

A motor for each jar
Use three short shafts, three motors and three drivers on an ESP32-S3, the way the Pellet Drum does it. Each jar plays its own rhythm, and they can interleave far faster than one shaft can flip.
More jars
A longer frame takes a fourth or fifth jar at about 170 mm each. More glass on one shaft needs slower flips or a NEMA 23.
Big jars
Pint or quart jars drop their fill farther, which lands louder and later. Move the shaft up to clear them, and use a NEMA 23.
A rain stick
Push nails through the walls of a long cardboard or plastic tube in a spiral, and pour in a cup of fill. On the same shaft, tipped slowly, the fill trickles through the nails for a second or more.
Servos instead of a shaft
Put each jar on its own hobby servo, tipping back and forth through about 160 degrees. It's cheaper, and every jar plays alone, but slower and buzzier than the stepper.