Skip to content

The Machine · Recipes

Drip Bowl

Design stage

Updated 2026-10-19

A metal bowl holding a little water, rocking slowly in a cradle and struck by a mallet. The sloshing water bends the pitch while the bowl rings.

Loading the model

Drag to turn · scroll to zoom

Printed

3DWhere we started. This is one version of it, with a 22 cm stainless mixing bowl a little over half full, rocking 7 degrees each way, and a yarn mallet on a trip hammer. Press Play: the mallet strikes, the bowl rocks while the water stays level, a nudge sets the water sloshing, and drops fall from the nozzle. The slosh is simulated as the water's first sloshing mode, not drawn by hand. Printed parts are drawn in orange; everything else is bought.

Overview

Cost, roughly
About $270
Printing
About 3 hours
Building
A weekend, after an evening testing the siphon
Difficulty
Involved

Anatomy

1
Energy source
A spring that flings the mallet, and a motor that rocks the bowl
2
Control
Two steppers, one rocking the cradle and one turning the mallet's cam, and a pump that sets how fast the bowl fills
3
Sounding body
A stainless mixing bowl with water in it, whose level and slosh bend the note
4
Reset
A bell siphon empties the bowl each time it fills, and the cam re-cocks the mallet after every strike
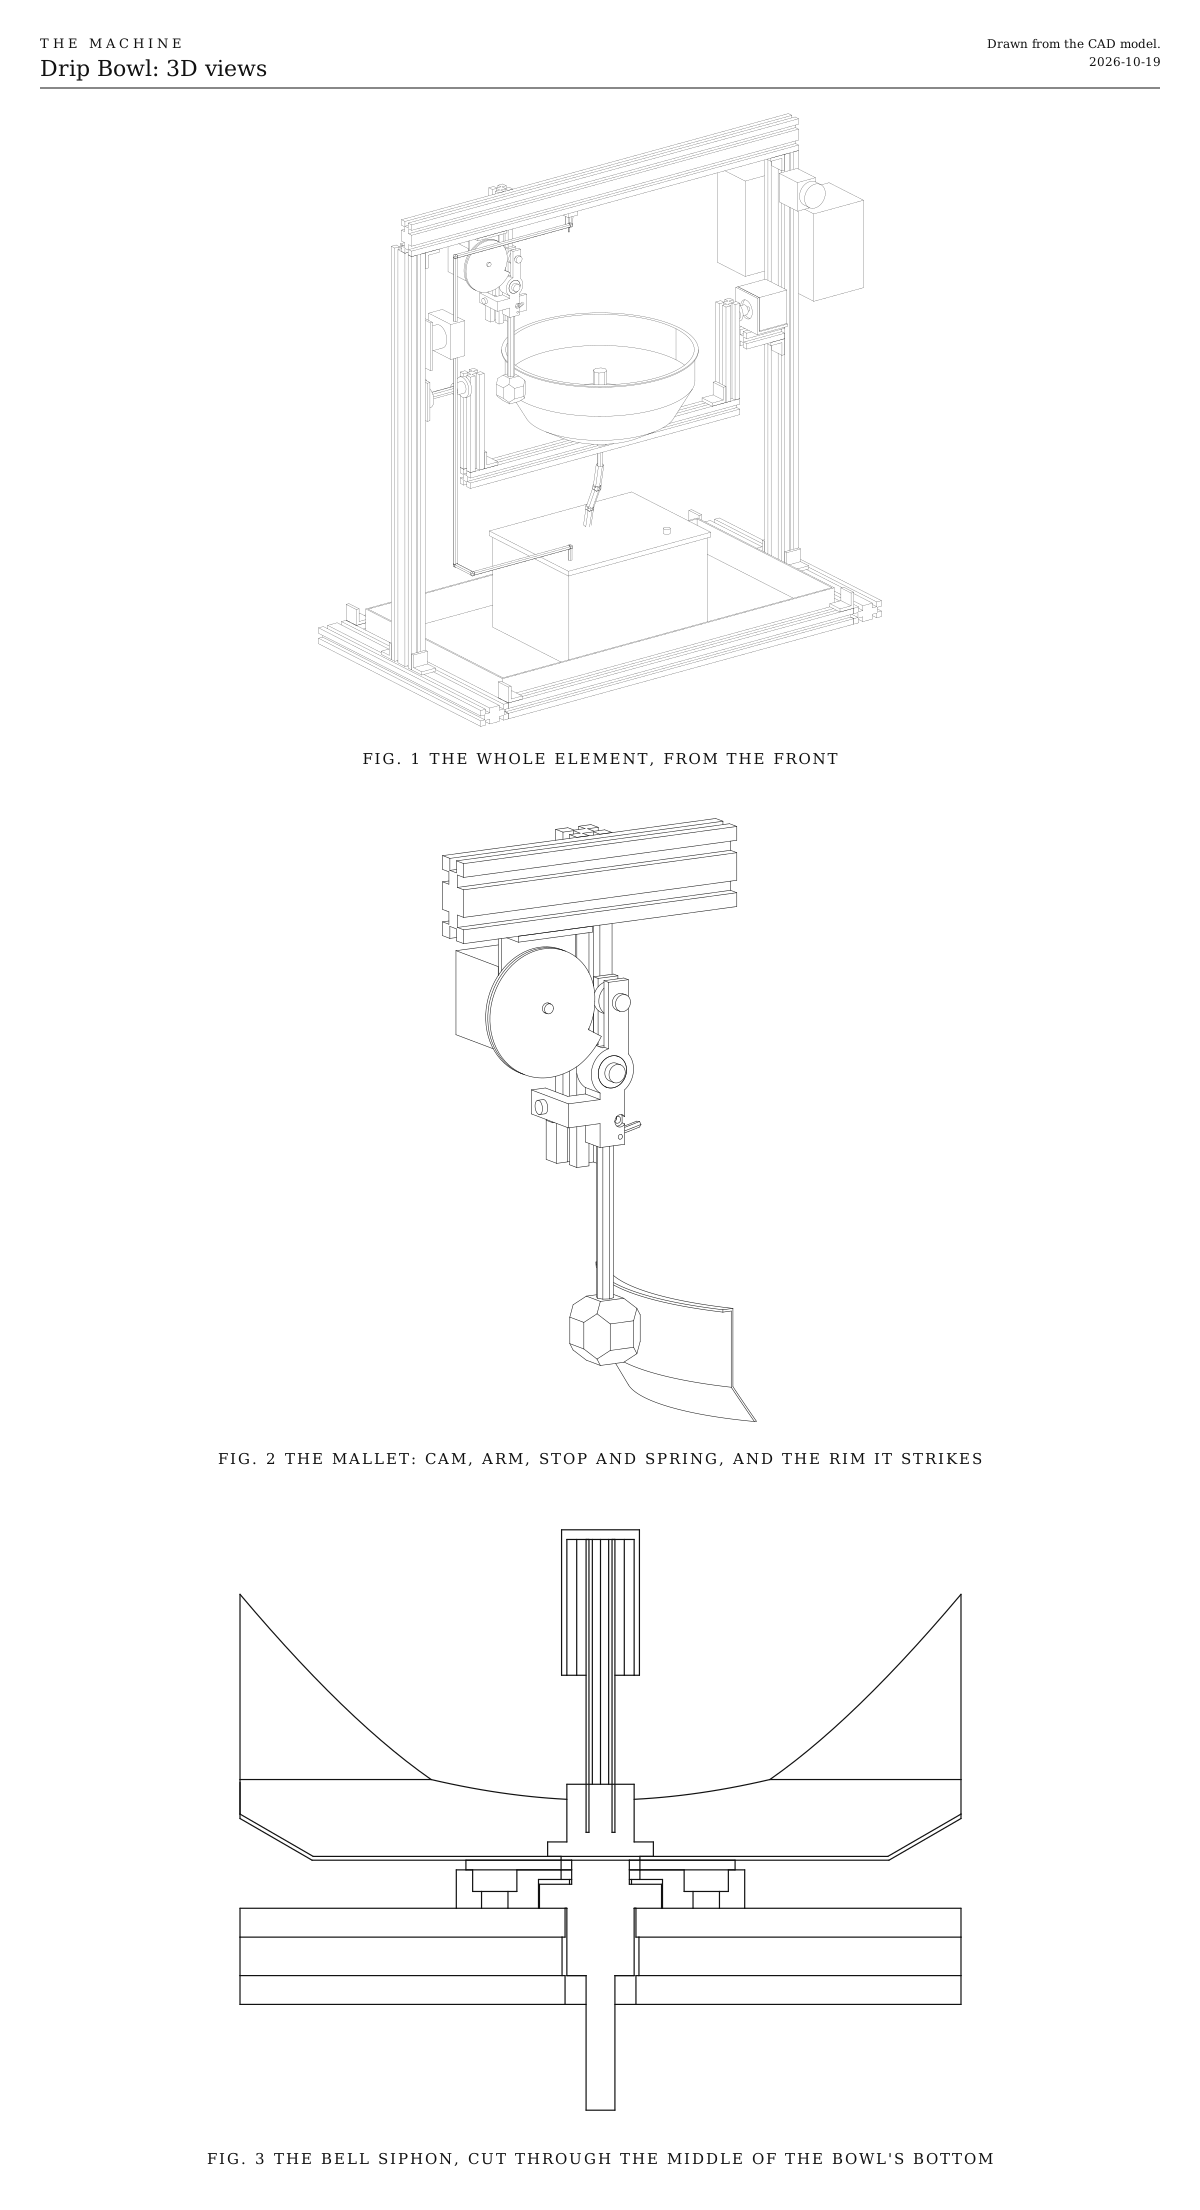
3D views. These show the whole element from the front, the mallet and its cam up close, and the bell siphon cut through the middle. They're drawn from the CAD model.
Fig. 13D views. These show the whole element from the front, the mallet and its cam up close, and the bell siphon cut through the middle. They're drawn from the CAD model.
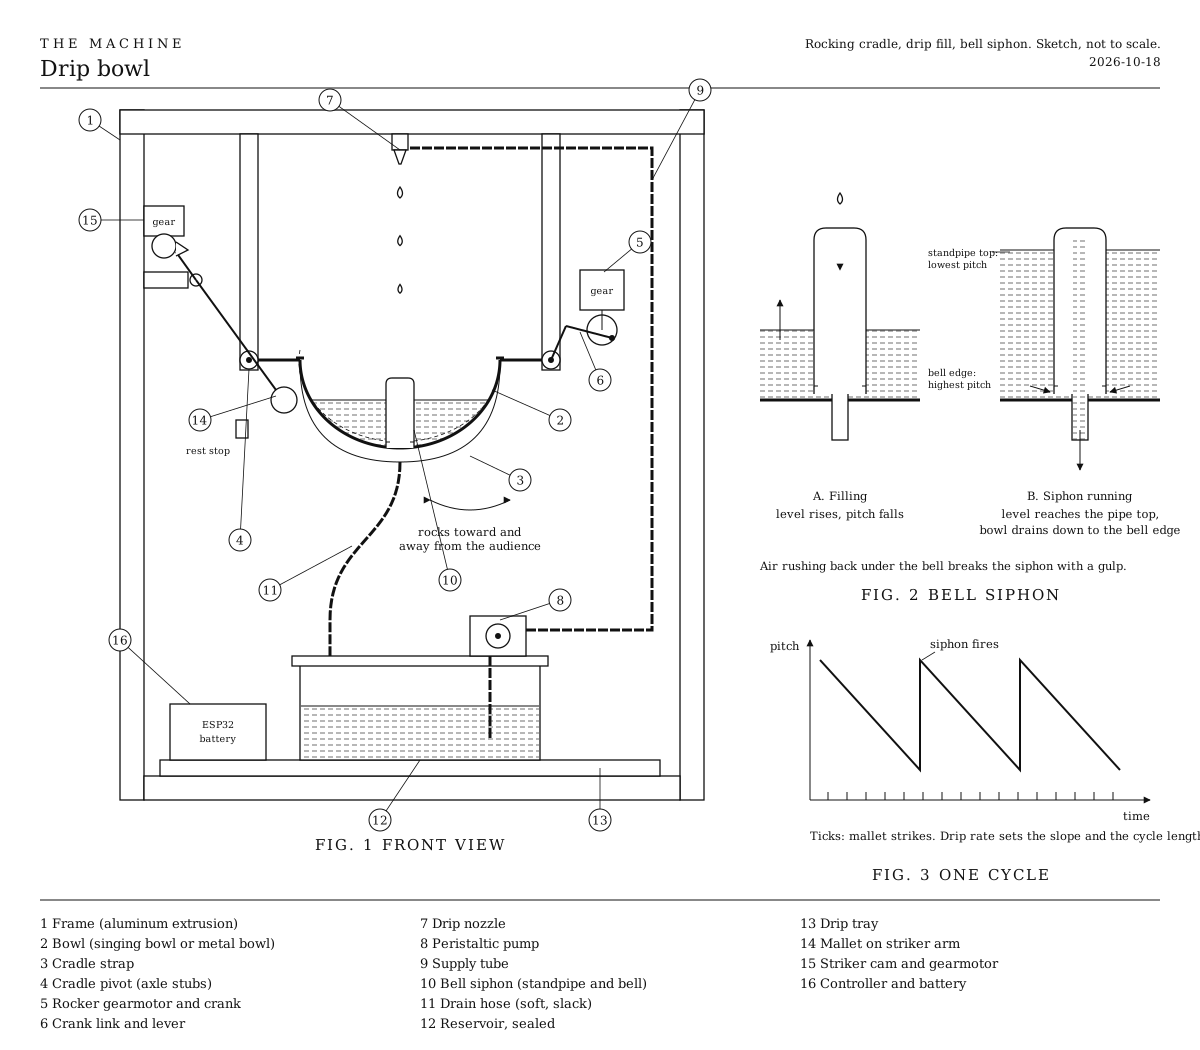
The first sketch. The sketch shows the drip fill, the bell siphon and how the pitch moves over one cycle. The siphon and the cycle are built as drawn, but the strap cradle and the crank were replaced by a rigid cradle and a motor on its axle.
Fig. 2The first sketch. The sketch shows the drip fill, the bell siphon and how the pitch moves over one cycle. The siphon and the cycle are built as drawn, but the strap cradle and the crank were replaced by a rigid cradle and a motor on its axle.

How it sounds

It’s a metal bowl holding a little water, struck by a mallet while it rocks slowly in a cradle. The sloshing water bends the pitch while the bowl rings, which is the warble heard when a bowl with water in it is struck.

  • Level sets pitch. More water gives a lower pitch. The first water barely changes the note, and most of the bend comes as it nears the top.
  • Slosh makes the warble. The water moves while the bowl rings, so each strike lands on a different slosh. Water sloshes at its own pace, a little under twice a second in this bowl, so a nudge gives a slow vibrato.
  • Tilting wavers the note. As the bowl tilts, the water climbs one wall and falls on the other, and the note wavers.
  • Drops plink. Each drop hitting the surface makes its own small sound.
  • The siphon gulps. The note glides back up as the bowl drains, and a gulp of air ends each cycle. The pump’s soft whir is part of the sound too.

How it works

  • A stainless mixing bowl hangs in a small V-slot cradle between two posts. Its axle is level with the top of the rim, so it rocks toward and away from the audience like a pendulum, turned by a stepper on the axle. We started with a 22 cm bowl a little over half full; the choices cover the alternatives.
  • The mallet strikes on the rocking line. The point of the rim on the axle’s line hardly moves as the bowl tilts, so a mallet there keeps the same small gap at any tilt. Struck at the front instead, the rim would rise and fall about 14 mm with each rock. The cradle’s left arm stands well clear of the bowl to leave room for the mallet.
  • The mallet is a trip hammer. A spring pulls it toward the bowl, and a stop holds it 2 mm clear. A cam on a second stepper pulls it back and lets it go. It flies in, its handle flexes past the stop, it strikes, and it springs back clear, so it rebounds instead of resting on the bowl and choking the note.
  • A pump drips water in. A peristaltic pump lifts water from a sealed reservoir to a nozzle above the bowl. The note slides down as the bowl fills. The drip rate is the control: it sets how fast the note falls and how long a cycle takes.
  • A bell siphon resets it. A standpipe rises through the middle of the bowl’s bottom, with a cap over it called the bell. When the water reaches the top of the standpipe, the siphon starts and drains the bowl down to the bell’s edge, then air rushing in breaks it with a gulp. It needs no electronics. The standpipe’s top sets the lowest note, and the bell’s edge sets the highest. The drain runs back to the reservoir through a soft hose.
  • In one cycle, the note falls slowly as the bowl fills, glides back up while the siphon drains it, and starts again.
  • The middle of a bowl’s bottom moves little when it rings, which is why a singing bowl rings on a palm. So the cradle holds the bowl there, and the drain goes through there.
  • An ESP32 listens for the wireless signal and drives both steppers and the pump. It runs from the shared power-tool battery. If it hears nothing for a couple of seconds, it stops rocking and goes quiet.

How it plays

  • It strikes on cue. The mallet waits cocked, so a strike lands a fixed time after its cue. Re-cocking takes about a second, so strikes can come about once a second at most.
  • Slow rocking makes the note waver. A sway of a few seconds each way tilts the waterline without making waves.
  • A nudge sets it sloshing. A quick small tilt sets the water sloshing at its own pace, and the note bends with it. Rocking at that same pace builds the slosh up until it spills, so the firmware keeps its rocking small near it.
  • The fill is the slowest voice. At a drop a second, the note takes hours to slide down; as a thin stream, 10 to 15 minutes. The siphon then lifts it back up in about a minute.

Before any code, rock the cradle by hand and strike the bowl as it tilts. Then give it a quick nudge and strike it again while the water sloshes.

Living with water

  • Water only falls, so the electronics sit above it. The box and the battery are on the right post, above the rim and outside the tray. The pump, its tubes and the nozzle stay on the left and over the middle.
  • Everything wet is over the tray. It catches drips, slops and a leaking hose.
  • To carry it, drain the bowl first. Lift off the bell and pull the standpipe out of the union, and the bowl drains into the reservoir. Then plug the reservoir’s vent and carry it level.
  • It loses water to the air. The open bowl evaporates a little, so top up the reservoir in a long installation.

Notes

  • This is a first design, drawn but not yet built. Expect one round of fitting, above all on the siphon.
  • The bowl in the model is a generic 22 cm mixing bowl. Measure yours and change the numbers at the top of the CAD script, and the axle’s height and the mallet’s place follow.
  • The slosh in the 3D model is simulated as the water’s first sloshing mode, with guesses for how fast it sloshes and how quickly it settles. The pitch figures are estimates from studies of wine glasses and singing bowls, listed below. Your bowl will differ, which is what the first assembly step is for.
  • Costs in the parts list are rough estimates for budgeting, not checked prices. They add up the version we started with.
  • There’s no firmware for it yet. Like every element, it will listen for Control, the one broadcast signal every element hears.

References

  • Trip hammer. A rotating cam lifts a hammer and drops it. The mallet here works the same way.
  • Wine glasses. A. P. French, “In vino veritas: A study of wineglass acoustics,” American Journal of Physics 51 (1983). It shows how a glass’s note falls as it fills, slowly at first and steeply near the top.
  • Singing bowls. D. Terwagne and J. W. M. Bush, “Tibetan singing bowls,” Nonlinearity 24 (2011). It studies bowls part filled with water: how the note falls with the level, and the waves the water makes when the bowl sings.

Parts

Ingredients

KindPartQtySourceEachFile
PrintedSaddle, holds the bowl on the cradleYour choice: see The cradle1··STL
PrintedMallet arm, clamps the handle and turns on the pivot bearing1··STL
PrintedCam, on the second stepperYour choice: see How it strikes1··STL
BoughtStainless mixing bowl, about 22 cm acrossYour choice: see The bowl1·$10.00
BoughtPush-fit bulkhead union for 6 mm tubeYour choice: see The resetIts thread goes through a hole in the middle of the bowl's bottom, with its rubber washer inside the bowl. The standpipe pushes into the top, and the drain tube into the bottom.1·$6.00
BoughtBrass tube, 6 mm outside and about 5 mm inside, 100 mm, for the standpipeYour choice: see The reset1·$3.00
BoughtCopper pipe, 15 mm, 40 mm long, and an end cap to fit, for the bellYour choice: see The reset1·$4.00
BoughtTube, 6 mm push-fit, about 10 cm, and soft silicone hose to fit over it, about 20 cm, for the drain1·$3.00
BoughtRubber sheet, 2 mm, a 56 mm disc with a hole in the middle, for the pad under the bowlYour choice: see The cradle1·$1.00
BoughtPeristaltic pump, 24 V, about 60 to 100 ml a minuteYour choice: see The pumpIt runs from the battery a little under its rated speed. Most come with a bracket and a short length of tube.1·$12.00
BoughtSilicone tube to fit the pump, about 1.5 mYour choice: see The pump1·$3.00
BoughtBlunt dispensing needle, 16 gauge, with a luer hub, and a P-clip to hold itThis is the nozzle. A blunt needle makes even drops.1·$2.00
BoughtFood box, about 3 liters, with a clip-down lid, for the reservoirDrill the lid for the drain hose and the pump's tube, each through a grommet, and a small vent you can plug for carrying.1·$6.00
BoughtShallow plastic tray, about 48 x 27 cm, for the drip trayA boot tray or a seed tray works. It sits inside the floor bars, under the bowl, the reservoir and the pump.1·$8.00
BoughtAluminum extrusion, 20 x 40 mm V-slot, 560 mm, for the top bar1·$11.00
BoughtAluminum extrusion, 20 x 40 mm V-slot, 520 mm, for the posts2·$10.00
BoughtAluminum extrusion, 20 x 40 mm V-slot, 320 mm, for the feet2·$7.00
BoughtAluminum extrusion, 20 x 20 mm V-slot, 500 mm, for the floor bars2·$5.00
BoughtAluminum extrusion, 20 x 20 mm V-slot, 390 mm, for the bar under the bowlDrill a 16 mm hole down through its middle for the drain fitting.1·$4.00
BoughtAluminum extrusion, 20 x 20 mm V-slot, 120 mm, for the cradle's arms2·$2.00
BoughtAluminum extrusion, 20 x 20 mm V-slot, 55 mm, for the motor's shelf, and 165 mm for the mallet's hanger1·$3.00
BoughtCorner brackets for 20 mm V-slot, with screws and T-nutsTen hold the frame together, two the cradle, two the motor's shelf, two the mallet's hanger, and one anchors the mallet's spring.17·$1.00
BoughtNEMA 17 stepper motor, 40 mm bodyOne rocks the cradle, and one turns the cam.2·$12.00
BoughtNEMA 17 L-bracket2·$3.00
BoughtTMC2209 stepper driverThey're quiet enough that neither motor shows under the ring.2·$6.00
BoughtRigid flange coupling, 5 mm boreYour choice: see How it rocksIt bolts to the right arm of the cradle, and the rocking motor's shaft goes into it.1·$3.00
BoughtRigid flange coupling, 8 mm bore, and an 8 mm steel rod 60 mm long, for the left axle1·$5.00
BoughtFlange bearing, 8 mm bore, two bolts (KFL08)1·$3.00
BoughtBall bearings, 625 size (5 mm bore, 16 mm across)One is the mallet's pivot, and one is the roller the cam pushes.2·$1.00
BoughtSpacer, 5 mm bore, about 12 mm long, for the mallet's pivot1·$1.00
BoughtYarn marimba mallet, medium, with a rattan handleYour choice: see The mallet headCut its handle so the middle of the head hangs 130 mm below the pivot, with about 25 mm in the arm's clamp.1·$15.00
BoughtExtension spring, about 25 mm long, lightYour choice: see How it strikesStart with one that pulls about 5 N stretched by 7 mm. A rubber band will do for a first try.1·$1.00
BoughtM4 screw, 20 mm, with a rubber cap, for the mallet's stop1·$1.00
BoughtMicro switch with a lever, for the rest switchThe mallet's arm presses it as it comes to rest, so the ESP32 can tell every strike happened.1·$1.00
BoughtESP32-S3 development board1·$6.00
BoughtBattery adapter for the shared power-tool platform, and a 5 V buck converterThe stepper drivers and the pump run from the battery, through the fuse, the stop button and the relay. The ESP32 takes 5 V.1·$15.00
BoughtThe listener parts every element carries, as on the Control pageA blade fuse holder and 3 A fuse, a latching stop button with a spare contact, the status light, the number switches and their resistors. The stop switch under Choices has a plain two-pole switch in place of the stop button.1Link$12.00
BoughtMomentary push button, normally open, for the test buttonA short press plays each note once, and a long press relearns what the element can by itself. Any small panel button that closes while it's pressed will do.1·$1.00
BoughtRelay module, 5 V, high-level trigger, contacts rated 10 AIt's the one switch every motor's power goes through, as on every element.1·$2.00
BoughtLogic-level MOSFET module that switches fully from 3.3 V, for the pumpYour choice: see The pumpIt sets the pump's speed, from single drops to a steady stream.1·$2.00
BoughtSchottky diode, 1N5819, across the pump1·$0.20
BoughtElectrolytic capacitors, 100 µF, 35 VOne goes across each stepper driver's motor supply, to soak up the spikes the motor sends back.2·$1.00
BoughtSealed junction box, about 120 x 80 x 55 mm, with cable glandsYour choice: see The electronics1·$8.00
BoughtClip-in slot covers for 20 mm V-slotThey hold the wires and the tubes in the slots, out of the way.1·$4.00
BoughtM5 screws, T-nuts and washers, assortedThey hold the saddle, the flange bearing, the motor brackets and the mallet's pivot (M5 x 30), and make the roller's axle (M5 x 20).1·$5.00
BoughtM3 screws, assortedThey hold the flange couplings and the motors. One is the cam's set screw, and one clamps the mallet's handle.1·$2.00
Total$274.20

Tools

  • 3D printer, PETG
  • Hex keys, 2.5, 3 and 4 mm
  • Step drill up to 16 mm, with cutting oil, for the bowl and the bar under it
  • Tube cutter or fine hacksaw, and a file, for the standpipe and the bell
  • Soldering iron, for the wiring and the pump's diode
  • A multimeter, to set the 5 V converter
  • A jug and a bucket, to test the siphon

Choices

Decisions that are yours to make. Where we started is the version in the 3D model and the ingredients: a starting point, not the right answer.

The bowl

What rings?

Stainless mixing bowl, about 22 cmWhere we started

SoundBright and a little clangy, ringing for several seconds. Its thin wall lets the water pull the note down a long way, most of an octave when it's nearly full.

It costs about $10 and is easy to drill. Bowls vary a lot, so pick one that rings long when it's balanced on a fingertip and struck.

Singing bowl, about 20 cm

SoundLong and pure, ringing 20 seconds or more with a slow beat in it

It costs $40 to $80. Its thick wall means the water bends it only a few semitones, and bronze takes patience to drill.

Brass or copper bowl

SoundWarmer than steel, and in between on ring and bend

Planters and serving bowls work. Every one is different, so listen before you buy.

The model is drawn around a 22 cm bowl. Another size needs the cradle and frame changed to match; Variations says how.

How much water

Between which levels does the siphon cycle?

Low, from a quarter to 40% deep

SoundThe note barely moves, and the drops plink clearly

It's safe to rock hard, since there's little to slop. It takes about 0.4 liters each cycle.

Middle, from 40% to 70% deepWhere we started

SoundA clear slide down each cycle, and a gentle warble while it sloshes

It takes about a liter each cycle in a 22 cm bowl.

High, from half to 85% deep

SoundThe biggest slide and the strongest warble

Rocking can slop water over the rim, so rock gently near the top. It takes about 1.2 liters each cycle.

The first water barely changes the note. The fall in pitch grows roughly with the fourth power of how full the bowl is, so the bottom third of the water does almost nothing and most of the bend comes in the top half. The standpipe's top sets the highest level, which is the lowest note, and the bell's edge sets where it drains to, which is the highest.

The cradle

How is the bowl held?

By the middle of its bottomWhere we started

SoundIt rings as long as it would balanced on a fingertip

The bowl sits on a rubber pad on a printed saddle, clamped by the drain fitting's nut. Nothing touches the wall and the bowl can't shift, so the mallet's gap stays put. It needs the hole in the bottom, which the siphon needs anyway.

A strap sling

SoundShorter and softer, because the strap touches the wall

It needs no hole to hold the bowl, but the bowl can creep in the strap and the mallet's gap wanders with it.

A ring cushion on a tray

SoundIt rings freely

The bowl sits loose, held by friction, so it suits gentle rocking only. With no hole, it goes with a reset that doesn't need one.

How it rocks

What moves the cradle?

A stepper on the axleWhere we started

SoundSilent, with a quiet driver

The firmware can rock it any way it likes, with a slow sway, a held tilt or a quick nudge, in time with the beat. Rocking in step with the shared beat needs this. It costs about $20 with its driver.

A gearmotor and crank

SoundA faint gearbox whir under the note

It's cheaper, and gives one smooth rock at a speed the firmware sets, with the crank's hole setting how far. It can't hold a tilt or keep its rocking in step with the beat.

Not rocked

SoundThe water stays still, so only the level and the drops move the note

It's the simplest build.

The mallet head

What strikes the bowl?

Yarn, a medium marimba malletWhere we started

SoundWarm and round, with a soft start to each note that tames the steel's clang

Its rattan handle gives the flex the strike needs.

Rubber, a xylophone mallet

SoundA clearer start that brings out the bowl's higher ringing

It comes on a rattan handle too.

Felt or suede over wood, a singing bowl striker

SoundThe classic bowl sound, soft and deep

Its handle is stiff wood, so fit the head to a length of rattan or a fiberglass rod.

Hard plastic or wood

SoundBright and bell-like, with a clank on top

It's loud, and the clank shows on every strike.

How it strikes

What drives the mallet?

A trip hammer on a stepperWhere we started

SoundYou hear only the strike, because the stepper re-cocks silently

A spring flings the mallet, and a cam pulls it back and lets it go. It waits cocked, so each strike lands a set time after its cue. It has one loudness, set by the spring.

The same trip hammer on a gearmotor

SoundA whir for about a second after each strike while it re-cocks, under the ring

It's cheaper, but its timing wanders a little as the battery runs down.

A servo flicking the mallet

SoundThe loudness can change from strike to strike

It's cheap and simple, but it hums while it holds, so it has to switch off between strikes, and it needs its own 6 V supply.

The pump

How does the water come in?

A small peristaltic pump, 24 VWhere we started

SoundSingle drops that plink, or a thin trickling stream, over a soft whir

At a drop a second, a cycle takes about six hours, which suits a long installation. Run steadily, it fills a cycle in 10 to 15 minutes.

A larger peristaltic pump

SoundA pouring stream, and a louder whir

A cycle takes three or four minutes, for a performance, but its smallest squirts are dribbles rather than drops.

A drip bottle with a valve

SoundSilent apart from the drops

A bottle above the bowl drips through a drip-irrigation valve set by hand. There's no motor, but someone has to pour the reservoir back into the bottle.

A peristaltic pump squeezes a tube, so the water only ever touches the tube and never the motor.

The reset

How does the bowl empty?

A bell siphonWhere we started

SoundThe note glides back up as it drains, in about a minute, and a gulp ends each cycle

It needs no electronics, but it needs a hole through the middle of the bowl's bottom, and an evening's testing to get it starting reliably.

A pump that runs both ways

SoundThere's no gulp, and the level moves only when the firmware says

A reversible pump fills and drains through the same fitting, so the firmware can set any level and even tune the bowl to the others. It needs an H-bridge driver in place of the pump's MOSFET.

None

SoundIt keeps one level, so one note

Fill it once by hand. Only the rocking, the drops and the strikes move the note.

The stop switch

What cuts the power to everything that moves at the element?

Latching emergency-stop button, with a spare contactWhere we started

The red mushroom head anyone nearby knows to hit. It stays down until it's twisted to release, so the element can't start again by accident. Its main contact cuts the power and its spare contact tells the ESP32. About $8.

Two-pole power switch, a rocker or a toggle

Smaller, plainer and cheaper, about $2. One pole cuts the power and the other tells the ESP32, so it does the same job. It doesn't read as a stop to someone who doesn't know the Machine, and it switches back on as easily as off. Rate its contacts above what the element draws, as the button's are.

Keep the second pole either way. The ESP32 knows where the cradle and the cam are only by counting the steps it sends, so the second pole is how it learns the power was cut, and finds level and the rest switch again before it moves. Without it, a cradle rocked by hand while it was off would rock off center. Either way the relay stays, since it's how a stop from the Bridge reaches the element when no one is at it. A two-pole switch wires as the button does: one pole in place of the main contact, from 11 to 12, and the other in place of the spare contact, from 13 to 14.

Print

Material
PETG
Layers
0.2 mm
Walls
4
Infill
40%, and 100% for the cam

Every part fits a 150 mm bed and prints without supports. PETG shrugs off splashes, and the saddle sits right under the water.

The printed parts

  • Saddle, holds the bowl on the cradle

    Which way up
    Upside down, with its top on the bed
    Supports
    None
    Time
    About 1 hour

    The drain fitting's nut drops into the hex pocket underneath, which stops it turning while you tighten the fitting from inside the bowl.

    STL ↓
  • Mallet arm, clamps the handle and turns on the pivot bearing

    Which way up
    On its front face, with the bearing pocket down
    Supports
    None
    Time
    About 1 hour

    The 625 bearing is a press fit. If it's too tight, sand the pocket a little; if it's loose, a dab of glue on the bearing's outer ring holds it. The M4 stop screw cuts its own thread in the tab.

    STL ↓
  • Cam, on the second stepper

    Which way up
    Flat, with the hub up
    Supports
    None
    Time
    About 1 hour

    Print it solid, with 100% infill, so the ramp doesn't wear under the roller. The M3 set screw cuts its own thread in the hub and bears on the shaft's flat.

    STL ↓

Assembly

  1. 1

    Listen to your bowl first. Balance it upside down on your fingertips and strike it near the rim with the mallet. Then turn it over, hold it by the middle of its bottom, and strike it again as you pour water in a little at a time.

    CheckThe note drops as the water rises, hardly at all at first and quickly near the top. That tells you where your range should be.

  2. 2

    Drill a hole through the middle of the bowl's bottom for the bulkhead union's thread, with the step drill.

    TrickyFind the middle by measuring across the bottom twice, since a hole off center makes the bowl hang tilted. Stainless hardens if the drill rubs, so press firmly at a low speed with cutting oil. Deburr both sides so the washer seals.

  3. 3

    Fit the bulkhead union with its washer inside the bowl and its nut underneath, hand tight plus a quarter turn.

    CheckFilled to the rim over a sink, nothing seeps from the hole after ten minutes.

  4. 4

    Make the siphon. Cut the standpipe so its top stands at your highest level, 70% of the bowl's depth here, counting the 10 mm that pushes into the union, and file two shallow notches across its top. Cut the bell, a length of 15 mm copper pipe with its end cap pushed on, so its edge sits at your lowest level, 40% here, when the cap rests on the standpipe.

    CheckWith the bell resting on the standpipe, you can blow up through the union from underneath, because the notches let air past the cap.

  5. 5

    Test the siphon on the bench before building anything else. Stand the bowl on something tall over a bucket, run the drain hose from the union down into the bucket, and fill the bowl from the pump or a jug.

    TrickyA bell siphon needs a minimum flow to start, and a trickle can run down the standpipe without catching. If it won't start, fill faster near the top, try a narrower standpipe, or put a small U-bend in the hose just below the bowl. If it never stops, the water is coming in faster than it can drain, so slow the pump.

    CheckWhen the water reaches the top of the standpipe, the siphon starts by itself, drains the bowl down to the bell's edge in about a minute, and stops with a gulp.

  6. 6

    Join the feet, posts, top bar and floor bars with corner brackets, two where each post meets its foot.

    CheckThe top bar is level, and the frame doesn't rock on a flat table.

  7. 7

    Build the cradle. Drill a 16 mm hole down through the middle of the bar that goes under the bowl, stand the two short arms on its ends, and join each corner with a corner bracket inside it. Bolt a flange coupling to the outer face of each arm, the 5 mm one on the right and the 8 mm one on the left, centered 105 mm above the top of the bar.

    TrickyThat height puts the axle level with the top of the rim, which is what keeps the mallet's gap steady as the bowl rocks. It's the bowl's height plus 10 mm for the saddle and the pad, so measure your bowl.

  8. 8

    Drop the union's nut into the hex pocket under the saddle, and bolt the saddle to the middle of the bar with two M5 screws into T-nuts. Lay the pad on it, set the bowl on top with the union's thread through both, and screw the union down into the nut by turning its hex inside the bowl.

    CheckTapped, the bowl rings about as long as it did on your fingertips.

  9. 9

    Fit the shelf to the right post's inner face with two corner brackets, and the rocking motor on it in its L-bracket, its shaft pointing at the cradle.

  10. 10

    Hang the cradle. Push the motor's shaft into the right coupling and tighten its set screws, then slide the 8 mm axle through the left coupling into the flange bearing, and bolt the bearing to the left post's inner face.

    TrickySlide the bearing up or down its slot, and the shelf up or down its post, until nothing binds anywhere in the swing. The motor's own bearings carry the right side, so keep its shaft fully in the coupling.

    CheckWith the motor unplugged, the cradle swings freely by hand and comes to rest level.

  11. 11

    Bolt the mallet's hanger behind the top bar with two corner brackets, right over the bowl's left rim. Hang the cam's motor under the top bar beside it in its L-bracket, with its shaft pointing forward.

  12. 12

    Build the mallet. Press a 625 bearing into the front of the printed arm, and fit the other on its M5 axle in the arm's fork as the roller. Clamp the mallet's handle in the arm so the middle of the head hangs 130 mm below the pivot.

  13. 13

    Bolt the arm to the front of the hanger with an M5 x 30 bolt, through a washer, the bearing, the spacer and the hanger, into a T-nut. Hook the spring between the hole near the bottom of the arm and the bracket on the hanger.

    TrickyThe bolt must clamp only the bearing's inner ring. If it pinches the arm, the arm drags and the strikes go soft.

    CheckFlicked, the arm swings freely, and the spring pulls it back until the stop screw rests on the hanger.

  14. 14

    Turn the stop screw until the head rests 2 mm from the bowl, just below the rim, on the line the bowl rocks about.

    TrickyThis gap is what lets the bowl ring. Too close, and the head rests on the bowl after each strike and chokes the note; too far, and the handle can't flex far enough to reach it.

    CheckRock the cradle by hand. The gap stays the same at every tilt.

  15. 15

    Push the cam onto its motor's shaft, level with the arm's roller, and tighten its set screw on the shaft's flat. Fit the rest switch to the hanger where the arm's tab presses it as the mallet comes to rest.

    TrickyThe cam turns only one way, the way that climbs its ramp. Turned backwards, its step jams against the roller.

    CheckTurned by hand, the cam lifts the roller, holds it, then lets it drop, and the mallet strikes and springs clear. The switch clicks as the arm comes to rest.

  16. 16

    Set the tray on the table inside the floor bars, and the reservoir in it under the bowl. Run the drain hose from the union, soft and slack, into the reservoir's lid.

    TrickyThe hose must hang loose. Pulled tight, it damps the bowl and fights the rocking.

  17. 17

    Mount the pump on the left post's inner face, above the tray. Run its suction tube from the reservoir up the left post, and its supply tube along the front of the top bar to the nozzle, clipped under the bar.

    CheckRun the pump. The drops land in open water, not on the bell.

  18. 18

    Mount the electronics box and the battery on the right post, above the rim, and wire it following the wire list under Wiring. The fuse comes first, then the 5 V converter for the ESP32, and the stop button and the relay for the motors and the pump. Bring every cable into the box from below, with a drip loop.

    TrickySet the 5 V converter with a multimeter before the ESP32 is connected. Most come set higher, and more than about 6 V destroys the board.

    CheckWith the battery in and no code running, both motors turn freely by hand and the ESP32's light is on. Press the stop button, release it, and nothing moves.

  19. 19

    Pour about 2.2 liters into the reservoir and run the pump until the siphon has fired once.

    CheckAfter the gulp, the bowl holds just under a liter, down to the bell's edge, and the reservoir's water still covers the end of the pump's tube.

Wiring

The fuse comes first, right after the battery. The ESP32-S3 runs from the 5 V converter. Everything that moves takes its power through the stop button and then the relay, so either one cuts it: both stepper drivers, and the pump through its MOSFET. The status light, the number switches and the battery reading are wired the same way on every element, so they're on the Control page, not here.

Wiring · Drip Bowl
PowerSignalMotorGround, all joinedPins drawn faint are left empty.

Wire list

  1. Battery adapter, +

    Fuse, 3 A, in

    PowerRed, 16 AWG

    As short as the adapter allows. Nothing connects ahead of the fuse.

  2. Fuse, 3 A, out

    5 V converter, IN+

    PowerRed, 22 AWG

  3. Fuse, 3 A, out

    Stop button, 11

    PowerRed, 18 AWG

  4. Stop button, 12

    Relay module, COM

    PowerRed, 18 AWG

    The stop button's main contact opens when pressed, cutting the power to everything that moves, so a program that hangs can't ignore it.

  5. Relay module, NO

    Rocking TMC2209 driver, VM

    PowerRed, 18 AWG

  6. Relay module, NO

    Cam TMC2209 driver, VM

    PowerRed, 18 AWG

  7. Relay module, NO

    Pump MOSFET module, DC+

    PowerRed, 20 AWG

  8. Capacitor, 100 µF, +

    Rocking TMC2209 driver, VM

    PowerThe capacitor's own leg

    Solder each capacitor's legs straight onto its driver's VM and GND pins. The stripe on its side marks the − leg.

  9. Capacitor, 100 µF, +

    Cam TMC2209 driver, VM

    PowerThe capacitor's own leg

  10. 5 V converter, OUT+

    ESP32-S3 board, 5V

    PowerRed, 22 AWG

    Only once the converter is set to 5 V.

  11. 5 V converter, OUT+

    Relay module, VCC

    PowerRed, 22 AWG

  12. ESP32-S3 board, 3V3

    Rocking TMC2209 driver, VDD

    PowerRed, 22 AWG

    The drivers' logic runs at the ESP32's 3.3 V, so their signals match.

  13. ESP32-S3 board, 3V3

    Cam TMC2209 driver, VDD

    PowerRed, 22 AWG

  14. Pump MOSFET module, OUT+

    Pump, +

    MotorRed, 20 AWG

  15. Pump MOSFET module, OUT−

    Pump, −

    MotorBlack, 20 AWG

    The MOSFET switches the pump's − side, so this wire isn't ground. Keep it apart from the ground wires.

  16. Diode, 1N5819, K

    Pump, +

    MotorThe diode's own leg

    Solder the diode right across the pump's terminals, its striped end to +.

  17. Diode, 1N5819, A

    Pump, −

    MotorThe diode's own leg

  18. Battery adapter, −

    5 V converter, IN−

    GroundBlack, 22 AWG

  19. Battery adapter, −

    Rocking TMC2209 driver, GND

    GroundBlack, 18 AWG

    The motor's return. Use the driver's GND pin next to VM.

  20. Battery adapter, −

    Cam TMC2209 driver, GND

    GroundBlack, 18 AWG

  21. Battery adapter, −

    Pump MOSFET module, DC−

    GroundBlack, 20 AWG

  22. Capacitor, 100 µF, −

    Rocking TMC2209 driver, GND

    GroundThe capacitor's own leg

  23. Capacitor, 100 µF, −

    Cam TMC2209 driver, GND

    GroundThe capacitor's own leg

  24. 5 V converter, OUT−

    ESP32-S3 board, GND

    GroundBlack, 22 AWG

  25. ESP32-S3 board, GND

    Rocking TMC2209 driver, GND

    GroundBlack, 22 AWG

    Each driver's other GND pin, next to VDD.

  26. ESP32-S3 board, GND

    Cam TMC2209 driver, GND

    GroundBlack, 22 AWG

  27. ESP32-S3 board, GND

    Pump MOSFET module, GND

    GroundBlack, 22 AWG

  28. Relay module, GND

    ESP32-S3 board, GND

    GroundBlack, 22 AWG

  29. Resistor, 10 kΩ, 2

    ESP32-S3 board, GND

    GroundThe resistor's own leg

  30. Rest switch, COM

    ESP32-S3 board, GND

    GroundBlack, 22 AWG

  31. Stop button, 14

    ESP32-S3 board, GND

    GroundBlack, 22 AWG

  32. Test button, 2

    ESP32-S3 board, GND

    GroundBlack, 22 AWG

  33. ESP32-S3 board, GPIO 16

    Rocking TMC2209 driver, STEP

    SignalAny color, 22 AWG

  34. ESP32-S3 board, GPIO 17

    Rocking TMC2209 driver, DIR

    SignalAny color, 22 AWG

  35. ESP32-S3 board, GPIO 18

    Rocking TMC2209 driver, EN

    SignalAny color, 22 AWG

    Low turns the motor on. The ESP32 holds it high while the element waits, so the bowl hangs free and the motor doesn't hum.

  36. ESP32-S3 board, GPIO 38

    Cam TMC2209 driver, STEP

    SignalAny color, 22 AWG

  37. ESP32-S3 board, GPIO 39

    Cam TMC2209 driver, DIR

    SignalAny color, 22 AWG

  38. ESP32-S3 board, GPIO 40

    Cam TMC2209 driver, EN

    SignalAny color, 22 AWG

  39. ESP32-S3 board, GPIO 41

    Pump MOSFET module, PWM

    SignalAny color, 22 AWG

    Short pulses make single drops, and a steady signal makes a stream.

  40. ESP32-S3 board, GPIO 5

    Relay module, IN

    SignalAny color, 22 AWG

  41. Resistor, 10 kΩ, 1

    Relay module, IN

    SignalThe resistor's own leg

    Holds the relay off while the ESP32 starts, when its pins float. With the relay off, the pump can't run either, even before its own pin is set.

  42. Rest switch, NC

    ESP32-S3 board, GPIO 21

    SignalAny color, 22 AWG

    The switch's normally closed contact, which opens when the arm rests on it. A strike shows as a quick close and open.

  43. Stop button, 13

    ESP32-S3 board, GPIO 4

    SignalAny color, 22 AWG

    The stop button's spare contact, so the ESP32 knows it's been pressed.

  44. Test button, 1

    ESP32-S3 board, GPIO 14

    SignalAny color, 22 AWG

    The test button. The ESP32's own pull-up holds the pin high until it's pressed, so nothing else goes on this pin.

  45. Rocking TMC2209 driver, 1A

    Rocking motor, A1

    MotorThe motor's own cable

    1A and 1B go to one coil, 2A and 2B to the other.

  46. Rocking TMC2209 driver, 1B

    Rocking motor, A2

    MotorThe motor's own cable

  47. Rocking TMC2209 driver, 2A

    Rocking motor, B1

    MotorThe motor's own cable

  48. Rocking TMC2209 driver, 2B

    Rocking motor, B2

    MotorThe motor's own cable

  49. Cam TMC2209 driver, 1A

    Cam motor, A1

    MotorThe motor's own cable, extended along the top bar

    The cam's motor is on the far side, over the bowl's left rim. Run its cable, and the rest switch's, along the top bar's back slot, above everything wet.

  50. Cam TMC2209 driver, 1B

    Cam motor, A2

    MotorThe motor's own cable, extended along the top bar

  51. Cam TMC2209 driver, 2A

    Cam motor, B1

    MotorThe motor's own cable, extended along the top bar

  52. Cam TMC2209 driver, 2B

    Cam motor, B2

    MotorThe motor's own cable, extended along the top bar

Get these right

Set the converter first
Most 5 V converters come set higher. Turn its screw with the battery in and a multimeter on its output until it reads 5.0 V, and only then connect the ESP32. More than about 6 V destroys the board.
Keep it dry
Bring every cable into the box from below, through a gland, with a drip loop just before it, so water running down a cable drips off the bottom of the loop instead of following it in. No wire runs under the bowl or the pump.
The pump's diode
Each time the pump switches off, its motor kicks back a spike. The diode across its terminals soaks it up before it can reach the MOSFET. Some modules have one built in; fit it anyway.
Finding the motors' coils
Motor wire colors vary by maker. Touch two wires together and turn the shaft by hand; if it suddenly turns stiffly, those two are one coil. If a motor runs backwards, swap the two wires of one coil.
Never unplug a motor with power on
Disconnecting a running stepper can destroy its driver. Press the stop button first.
The pins
Any free ESP32-S3 pins will do, except 0, 3, 45 and 46, which the board reads as it starts, 19 and 20, which are its USB port, and 35 to 37 on boards with eight megabytes of extra memory (marked R8). GPIO 14 carries the test button, on every element. If you use others, the firmware needs to know.

Mounting

Everything fixes to the V-slot frame with T-nuts and screws, so any part can slide to a new place or come off with a hex key. Water only ever falls, so the wet parts stay on the left and over the middle, above the tray, and the electronics stay on the right, above the rim, where nothing wet can drip on them.

The frame
Corner brackets join it, with M5 screws into T-nuts. The posts stand on the feet, the top bar sits on the posts, and the floor bars join the feet front and back.
The cradle
It hangs between a flange bearing on the left post's inner face and the rocking motor's shaft on the right. Both can slide in their slots, which is how the axle is lined up.
The rocking motor
It sits in its L-bracket on a short shelf, a 20 x 20 offcut bolted to the right post's inner face with two corner brackets, at rim height.
The mallet
Its hanger is a short 20 x 20 bar bolted behind the top bar with two corner brackets, right over the bowl's left rim. The arm turns on the hanger's front face, a bracket on its inner face anchors the spring, and the rest switch sits on its outer face. The cam's motor hangs under the top bar in its L-bracket, beside the hanger.
The nozzle
A P-clip under the top bar holds the needle's hub, off center so the drops miss the bell. It slides along the bar's bottom slot.
The pump
It bolts to the left post's inner face, above the tray, so a leak drips into the tray. Its tubes run up the post and along the front of the top bar in the slots.
The reservoir and the tray
They sit on the table inside the floor bars, the reservoir right under the bowl, so the drain hose drops straight into its lid.
The electronics
The sealed box bolts to the back of the right post on two T-nuts, above the rim and outside the tray.
The battery
The adapter bolts to the outer face of the right post, also above the rim, so the pack slides on and off without reaching past the bowl.
The stop button
It sits in its own housing on the front of the right post near the top, where a hand finds it without reaching over the water.
The wires
Clip-in slot covers hold them in the slots. The wires from the left side, the cam's motor and the rest switch, run along the top bar's back slot to the box, above everything wet.

The electronics

Hidden in a box, or on show?

Sealed boxWhere we started

A junction box with cable glands, with every cable coming in from below, keeps out splashes, but it hides the electronics.

Clear-lidded box

This is the same sealed box with a clear lid and the boards on a short DIN rail inside, so they're on show and still dry. It costs a few dollars more.

Open plate

The boards sit on standoffs on a plate on the post, with the wires dressed along the slot. It's the most on show, and only sensible while the wet and dry sides stay apart.

Whichever you pick, keep it above the rim on the dry side, and keep the stop button on the outside, where anyone can reach it.

Tuning

Tuning

The test button
A short press strikes the bowl once, about a second after you let go. Hold it for two seconds and it lets the cradle settle level and counts from there, then re-cocks the mallet against its rest switch. It works only while the element is resting, with no Bridge in range or with the Bridge holding it silent. While it plays or is stopped, the button does nothing. A stop ends a test at once, and pressing again ends one early. The siphon's levels and the stop screw's gap are still set by hand.
The note barely moves as it fills
The water range sits too low in the bowl. Raise the standpipe's top and lengthen the bell to match, since most of the bend comes in the top half.
Water slopping over the rim
The range is too high for how far it rocks. Rock less near the top of the cycle, or lower the standpipe. Rocking near the water's own sloshing pace builds waves fast, so keep it slower or smaller than that.
A thud where there should be a ring
The head is resting on the bowl, or something else is touching it. Turn the stop screw to open the gap a little, and check the hose hangs free of the bowl.
A double hit, a quick "ta-dak"
The handle is springing back into the bowl. Open the gap a little, or use a stiffer handle or a softer head.
Strikes too quiet or too loud
The spring sets the loudness. Fit a stiffer spring for louder strikes and a lighter one for softer. A bigger lift on the cam also strikes harder, but it needs more room between the mallet and the cradle's arm.
A buzz with every note
Something touches the bowl and rattles, most often the bell on the standpipe, the hose or the stop screw. Touch each in turn while the bowl rings until the buzz stops.
The siphon trickles but never starts
The water is coming in too slowly to start it. Fill faster near the top, narrow the standpipe, or add a small U-bend in the hose just below the bowl.
The siphon never stops
The water comes in faster than the siphon can drain it. Slow the pump, or use a wider standpipe, which drains faster.
The gulp too loud or too quiet
A clean, straight edge on the bell gives the biggest gulp. File small notches in the edge and the air gets in gradually, which softens it.
Drops landing on the bell
Slide the nozzle's clip along the top bar until they land in open water. Drops from higher plink louder, so a longer tube down from the clip gives softer ones.
A whir or hum under the note
A stepper driver isn't in its quiet mode; the TMC2209 has a near-silent mode for slow moves. Re-cocking the cam more slowly is quieter still.
The water creeping down over days
It evaporates from the open bowl. Top up the reservoir every day or two in a long installation.

Variations

Another size
A bigger bowl rings lower and sloshes more slowly, about one and a half times a second at 30 cm, and takes over twice the water each cycle. A 16 cm bowl sloshes faster and takes about a third of the water. Change BOWL_PROFILE at the top of the CAD script, and the axle's height and the mallet's place follow. Widen the cradle and the frame (ARM_IN and POST_X) by as much as the radius grows.
A tipping bowl
Like a tipping-bucket rain gauge, the bowl fills until it tips, dumps, and swings back against a stop that strikes it. It needs no siphon, and the drip rate alone sets the rhythm.
A water gong
A winch lowers the ringing bowl into a tub of water, bending its pitch down as it goes in, the way orchestral percussionists dip a struck gong.
Setting the pitch exactly
A reversible pump fills and drains the bowl to a commanded level, as in the pump-both-ways reset. With a small microphone listening to the note, the firmware can stop the pump at a chosen pitch and lock the bowl to the ensemble's tuning.
Rubbing instead of striking
A singing bowl rubbed around its rim sings one long note, and the water in it dances in standing waves. A machine would need a padded wheel pressing on the rim at a steady pressure, which is hard to get right; a hand-held stick shows whether it's worth it.