Skip to content

The Machine · Recipes

Cannon

Design stage

Updated 2026-10-20

A clear tube that fires a weighted teardrop on a tether steeply down at a target, then reels it home and re-cocks itself as it reels. Mostly bought; only the teardrop and the holders are printed.

Loading the model

Drag to turn · scroll to zoom

Printed

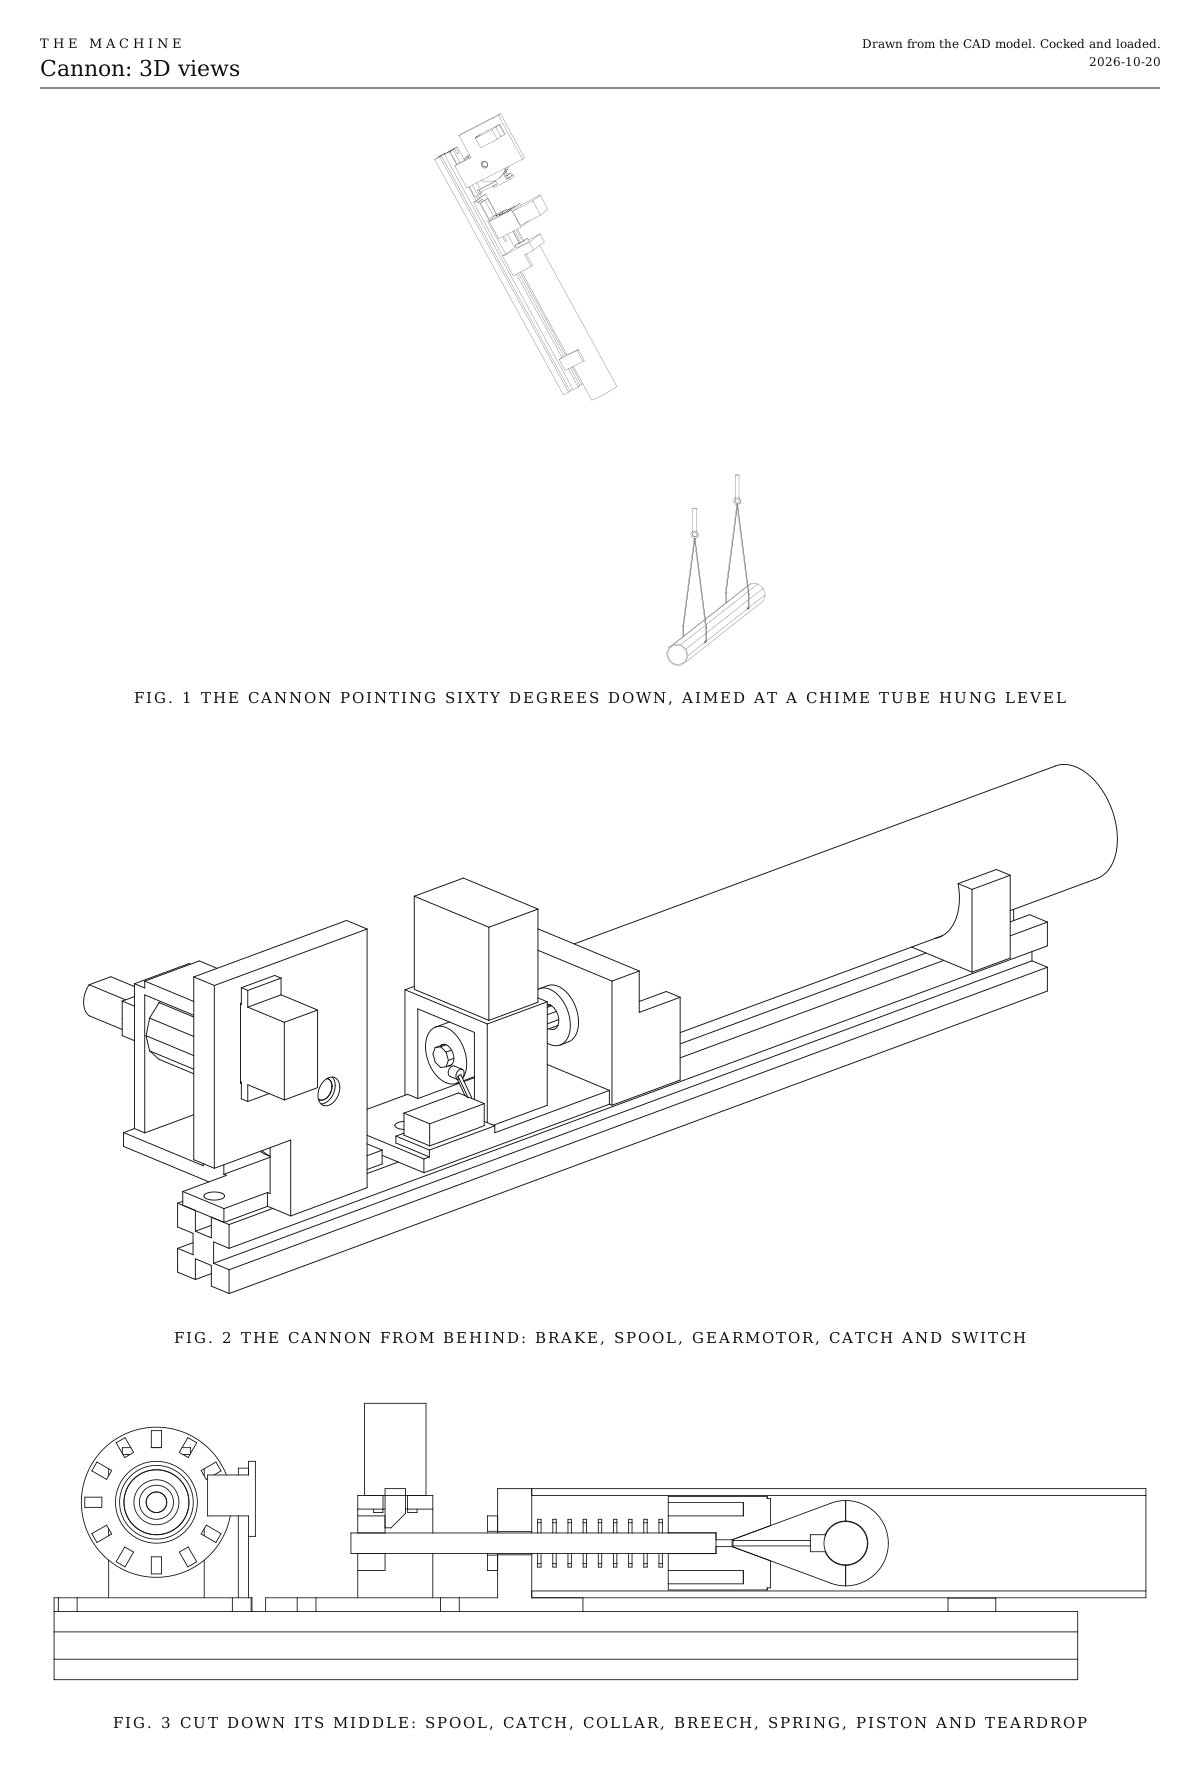
3DWhere we started. One version of it: a 32 mm clear tube on a 20 x 20 V-slot spine, pointing 60 degrees down at a chime tube hung level on two cords. The barrel is drawn as its outline so you can see inside it. Press Play: it fires, strikes, swings under the muzzle, reels home and cocks. The shot is slowed ten times; everything after the hit runs at its own speed, simulated from the physics. Printed parts are drawn in orange; everything else is bought.

Overview

Cost, roughly
About $120
Printing
About 10 hours, with three teardrops
Building
A weekend
Difficulty
Involved

Anatomy

1
Energy source
A compression spring, squeezed by the tether as it reels the teardrop home
2
Control
A lock-style solenoid's tongue holds the piston's rod until a pulse pulls it in
3
Sounding body
Whatever the teardrop strikes; we started with a chime tube hung level across the shot
4
Reset
A gearmotor reels the teardrop home, and the teardrop pushes the piston back until the catch clicks
3D views. The cannon aimed at a chime, the cannon from behind, and the cannon cut down its middle. Drawn from the CAD model, cocked and loaded.
Fig. 13D views. The cannon aimed at a chime, the cannon from behind, and the cannon cut down its middle. Drawn from the CAD model, cocked and loaded.

How it works

  • A clear tube on a V-slot spine fires a teardrop with a steel ball sealed in its nose. A braided tether runs from the teardrop’s tail back through the cannon to a spool. We started with a 32 mm tube pointing 60 degrees down at a chime tube hung level; the choices below cover the alternatives.
  • Cocked, a spring behind the piston is squeezed, and the teardrop’s tail sits in a cone in the piston’s front, matched to its taper. A light carbon rod runs from the piston out through the breech block, and the tongue of a lock-style solenoid holds a collar on the rod.
  • A short pulse fires it. The pulse pulls the tongue in, the spring throws the piston and the teardrop forward 30 mm, the collar stops on a rubber washer, and the teardrop flies on, nose first, pulling its tether off the spool.
  • The spool spins free on a one-way bearing while the tether pays out, about 50 turns a second. As the teardrop lands, a small servo presses a felt pad on the spool’s rim, so the spool doesn’t spin on and throw loose tether.
  • A gearmotor reels it home and re-cocks it. As it winds the spool, the tether pulls the teardrop home tail first, and its taper steers it into the muzzle and down the bore into the cone. The motor keeps winding, so the teardrop pushes the piston back and squeezes the spring, until the collar rides up the tongue’s slanted face and the tongue drops in front of it. A switch behind the collar says it’s cocked, and the motor stops.
  • Only the teardrop and the holders are printed. The tube, the spring, the rod, the catch, the gearmotor, the bearings and the sensors are bought.
  • An ESP32 runs it. It listens for the wireless signal, fires the catch, drives the brake and the gearmotor, and reads the switch and the spool’s sensor. It runs from the shared power-tool battery.

After a hit

The teardrop hangs from the muzzle on its tether, like a pendulum. Reeling it in shortens the pendulum, and a shortening pendulum swings faster and wider, the way a lure whips around a rod’s tip when it’s reeled right up. That decides how the cannon has to aim.

  • Hit level with the muzzle, the teardrop starts its swing level, and the simulation has it wrap round the muzzle one to three times before it gets home, at any reel speed.
  • Hit from well above, it starts within about 30 degrees of hanging straight down, swings under the muzzle and comes back up into it. So the cannon fires about 60 degrees down, at targets below and in front of it.
  • Hit square on. A hit that only grazes the target leaves the teardrop falling fast past it, and that speed becomes a wide swing when the tether takes hold. The target’s struck face has to point back at the muzzle, so the teardrop bounces back up its own path.
  • Keep the space below the muzzle clear. In the model, the swing reaches 60 degrees either side of straight down and passes about 3 cm under the cannon.

What it can hit

  • Anything that rings and can be hung or held with its struck face pointing back at the muzzle. A chime tube hung level across the shot by cords at its nodes does this, and so do metal bars, wood blocks, a gong or a bowl tipped toward the cannon.
  • A tube hung upright is a poor target from above. The teardrop only grazes it and then swings wide.
  • It strikes at about 4.5 m/s, like a light mallet. Metal and hollow wood carry it best.

Timing

  • From the pulse to the strike takes about a tenth of a second at our range: a few hundredths for the tongue to pull in, then the 15 ms stroke and a 75 ms flight. The firmware fires that much early so the strike lands on the beat. Measure it for each target and store it with the target.
  • Reloading takes about two and a half seconds after the hit: about a second to reel the teardrop to the muzzle, then the rest to draw it down the bore and cock. So a single cannon plays a note every three seconds or so at most.

Sensing and faults

  • The cocked switch is the only proof that it’s safe and ready.
  • The spool’s sensor counts the slots in the spool’s flange. It shows the tether going out on a shot and coming in on the rewind, so the ESP32 knows the teardrop actually flew and where it is. If it stops counting while the motor runs, something has stalled: the teardrop is seated and cocking, or something is jammed.
State What happens Leaves when
Ready Cocked, teardrop seated, brake on, motor off A cue arrives
Fire Brake off, then the catch pulses The spool starts counting
Flight Spool free The strike time comes, and the brake goes on
Rewind Brake off, motor winds The count nears home
Cock Motor keeps winding The switch reads cocked, then the motor stops and the brake goes on

A cue that arrives outside Ready is ignored; it doesn’t queue shots. Every fault stops the motor, leaves the catch off, puts the brake on and holds. Once the fault clears, it tries one slow rewind and cock. If that fails, it stays in fault until the power is turned off and on. It never fires from a fault.

Fault How it shows Likely cause
Tangle The count stops during Rewind while it’s still far from home The tether caught on the target or the frame
No latch Cocking runs past its time limit without the switch Tongue stuck, collar slipped on the rod, teardrop not seated
Misfire After the pulse, the spool never counts The tongue didn’t pull in
Teardrop lost The count goes far past normal, or the rewind spins with no load The tether broke or the knot slipped

Since elements only listen, a fault shows on the element itself, on its status light, for a technician to read.

Notes

  • This is a first design, drawn but not yet built. Expect one round of fitting.
  • The motion in the 3D model is simulated from the physics, with guesses for the shot’s speed (4 m/s from the piston) and how much the teardrop bounces. A test build will give the real figures.
  • Costs in the parts list are rough estimates for budgeting, not checked prices. They add up the version we started with.
  • The firmware isn’t written yet. It will listen for Control, the one broadcast signal every element hears.

References

  • Robot that swings and climbs like Spider-Man (Hackaday.io). A pen-spring launcher fires a tethered grapple on Kevlar thread, a servo pushes the trigger, and a geared winch reels it in. The closest precedent for the cannon.
  • Printable spring trigger (MakerWorld, Bri). A compact spring trigger mechanism for props, using a pen spring.
  • Solenoid-driven projectile launcher board (Tindie, Questwise Ventures). A solenoid and spring launcher, reset by hand.

Parts

Ingredients

KindPartQtySourceEachFile
PrintedTeardrop noseYour choice: see What strikes3··STL
PrintedTeardrop tail, with the tether's channel and a pocket for its knot3··STL
PrintedPiston, with the cone the teardrop's tail sits in1··STL
PrintedBreech block, holding the barrel's end, the rod's guide, the catch and the cocked switch1··STL
PrintedMuzzle cradle1··STL
PrintedSpool, with a slotted flange the sensor counts1··STL
PrintedSpool bracket, carrying the spool's shaft, the gearmotor, the brake's servo and the sensor1··STL
BoughtClear polycarbonate tube, 32 mm outside, 28 mm bore, cut to 180 mmYour choice: see The barrel1·$8.00
BoughtCompression spring, about 14 mm across, 1 mm wire, about 85 mm longYour choice: see The spring1·$2.00
BoughtCarbon fiber tube, 6 mm outside, 4 mm inside, cut to 107 mmThe rod from the piston out through the breech. The tether runs through it.1·$4.00
BoughtClamp collar, 6 mm bore, aluminumThe catch's tongue holds it, and it stops the piston on the washer. A clamping collar, rather than one with a set screw, won't crush the carbon tube.1·$3.00
BoughtRubber washer, 6.5 mm hole, about 16 mm across, 3 mm thickYour choice: see The stop1·$1.00
BoughtLock-style solenoid, 12 V, with a slanted tongueYour choice: see The triggerThe small kind sold for cabinet and drawer locks. Its tongue sticks out by itself and pulls in while powered.1·$7.00
BoughtMicro switch with a roller leverSays the cannon is cocked.1·$1.00
BoughtSteel ball bearings, 1/2 inch (12.7 mm)Your choice: see What strikes3·$1.00
BoughtBraided fishing line, 20 to 30 lbYour choice: see The tether1·$8.00
BoughtOne-way needle bearing, 6 mm bore, 10 mm across, 12 mm long (HF0612)Lets the spool spin free as the tether pays out, and lets the motor wind it in.1·$2.00
BoughtHardened steel dowel pin, 6 x 45 mmThe spool's shaft. The needle bearing runs straight on it, so it has to be hardened and smooth.1·$1.00
BoughtBall bearing, 626 size (6 mm bore, 19 mm across)2·$1.00
BoughtFlexible shaft coupler, 3 mm to 6 mm1·$3.00
BoughtN20 metal gearmotor, 12 V, about 200 rpm, rated at least 2 kg·cmWinds the spool. It has to squeeze the spring through the tether, about 2 kg·cm at the spool.1·$6.00
BoughtMicro servo, 9 g, metal gears (MG90S)The spool's brake.1·$4.00
BoughtSelf-adhesive felt padsA strip on the brake servo's horn.1·$1.00
BoughtSlotted optical sensor board (a U-shaped "speed sensor" module)Counts the spool's slots, so the ESP32 knows how much tether is out and whether the spool is turning.1·$2.00
BoughtAluminum extrusion, 20 x 20 V-slot, 300 mm, for the spine1·$5.00
BoughtM5 screws and T-nuts, M3 and M2 screws, assortedBreech block and spool bracket (M5, four), muzzle cradle (M5, one), the catch (M3, four), the switch (M2, two), the servo (M2, two), the sensor (M3, two) and the gearmotor (M1.6, two, usually supplied).1·$4.00
BoughtESP32 development board1·$6.00
BoughtBattery adapter for the shared power-tool platform, and a 5 V buck converter1·$15.00
BoughtAdjustable buck converter, set to 12 V, 3 AThe gearmotor and the catch run at 12 V, after the stop button and the relay.1·$3.00
BoughtThe listener parts every element carries, as on the Control pageA blade fuse holder and 2 A fuse, a latching stop button with a spare contact, the status light, the number switches and their resistors. The stop switch under Choices has a plain two-pole switch in place of the stop button.1Link$12.00
BoughtMomentary push button, normally open, for the test buttonA short press plays each note once, and a long press relearns what the element can by itself. Any small panel button that closes while it's pressed will do.1·$1.00
BoughtRelay module, 5 V, high-level trigger, contacts rated 10 A1·$2.00
BoughtTwo logic-level MOSFETs (IRLB8721), two Schottky diodes (1N5819), two 100 Ω and three 10 kΩ resistors, a 100 µF 25 V capacitorOne MOSFET and diode for the catch, one for the gearmotor.1·$4.00
BoughtSmall project box, for the electronicsYour choice: see The electronics1·$5.00
BoughtTwelve-core cable, 24 AWG or heavier, long enough to reach the cannonFrom the box to the cannon. Ten cores are used.1·$4.00
SalvagedSomething to hit, for testing, such as an aluminum tube 25 mm across and 300 mm long, with cord and two eye screwsAny chime tube, bar or block will do, as long as its struck face points back at the muzzle. See Mounting.1··
Total$119.00

Tools

  • 3D printer, PETG
  • Hex keys, 2.5, 3 and 4 mm
  • Fine saw or tube cutter, for the tube and the carbon rod
  • Deburring tool and fine sandpaper, for the muzzle's edge
  • Soldering iron and heat-shrink, for the wiring
  • Epoxy and superglue
  • A needle threader or a length of fine wire, to pull the tether through the rod
  • A multimeter, to set the two converters

Choices

Decisions that are yours to make. Where we started is the version in the 3D model and the ingredients: a starting point, not the right answer.

The barrel

What does the shot run through?

Clear polycarbonate tubeWhere we started

SoundA dull clack from the tube on each shot, under the chime

You see the spring squeeze, the teardrop seat and the piston jump. Polycarbonate shrugs off knocks where acrylic would crack. 32 mm outside, 28 mm bore.

Aluminum tube

SoundA faint ping on each shot, unless the cradles damp it

A machined look that hides the mechanism. Its bore is smooth from the start. Same sizes.

Printed tube

SoundThe quietest, a dull thump

One opaque piece and the longest print. The layer lines in the bore drag on the piston until they're sanded smooth.

Whichever tube, round the inside of the muzzle's edge. The teardrop's tail slides in over it on the way home.

What strikes

What is the teardrop's nose made of?

PETG nose with a steel ball insideWhere we started

SoundA clear, bright tick, like a hard plastic mallet

The ball sits sealed in the nose and keeps the nose leading in flight. About 15 g.

TPU nose

SoundRounder and warmer, with less attack, like a rubber mallet

Print only the nose half in TPU. It bounces less, so the teardrop comes home with less swing.

The bare ball as the nose

SoundThe loudest and most metallic, rich in overtones

A nose half with a socket instead of a pocket, so a third of the ball shows. It marks soft metals over time.

A teardrop comes off the tether by untying it, so a few spares with different noses make a palette.

The trigger

What lets the piston go?

Lock-style solenoidWhere we started

SoundA sharp click just before each shot

One bought part is the catch, its spring and its trigger. The fastest and most even delay from cue to shot. It has to pull its tongue out from under the spring's load, so test that on the bench first.

Pull solenoid and a printed pawl

SoundA softer click

More parts, but the pawl's lever can be lengthened if the release sticks.

Micro servo

SoundA short whirr instead of a click

No MOSFET or diode, but 50 to 100 ms slower and less even, which makes landing on the beat harder.

The stop

What does the collar hit when the piston stops?

Rubber washerWhere we started

SoundA soft thump, so the chime is what you hear

Kind to the printed block. Thicker rubber takes a little out of the shot.

Steel washer

SoundA crack on every shot, like a real cannon's report

The block takes the knock, so it wants full infill around the rod's hole.

The spring

How hard does it fire?

Light, about 0.2 N/mm

SoundSoft strikes

Reloads quickly. Reach no more than 15 cm.

Medium, about 0.36 N/mmWhere we started

SoundA clear ring from a metal tube

About 16 N to cock, within the gearmotor's reach. Good from 10 to 30 cm.

Stiff, about 0.6 N/mm

SoundLoud

The gearmotor works near its limit and cocks slowly, and the catch is harder to release.

Any compression spring about 14 mm across that fits over the 6 mm rod. Keep its length near 85 mm, or move the collar to suit.

The tether

Should the line show?

A bright braidWhere we started

It draws the shot in the air, so the audience sees the teardrop fly out and come home on its line.

A dark braid

It nearly disappears, and the teardrop seems to fly home by itself.

Braided fishing line, 20 to 30 lb. Braid barely stretches, so the timing stays steady. Nylon monofilament stretches and springs back.

The stop switch

What cuts the gearmotor's and the catch's power at the element?

Latching emergency-stop button, with a spare contactWhere we started

The red mushroom head anyone nearby knows to hit. It stays down until it's twisted to release, so the element can't start again by accident. Its main contact cuts the power and its spare contact tells the ESP32. About $8.

Two-pole power switch, a rocker or a toggle

Smaller, plainer and cheaper, about $2. One pole cuts the power and the other tells the ESP32, so it does the same job. It doesn't read as a stop to someone who doesn't know the Machine, and it switches back on as easily as off. Rate its contacts above what the element draws, as the button's are.

Keep the second pole either way. It tells the ESP32 the power was cut, so it rewinds slowly and cocks before it fires again when the power comes back, as after a stop from the Bridge. Either way the relay stays, since it's how a stop from the Bridge reaches the element when no one is at it. A two-pole switch wires as the button does: one pole in place of the main contact, from 11 to 12, and the other in place of the spare contact, from 13 to 14.

Print

Material
PETG
Layers
0.2 mm
Walls
4
Infill
40%, the spool 15%

Every part fits a 150 mm bed and prints without supports. The teardrop prints in two halves that are glued around the steel ball and the tether's knot. PETG takes the shock of every shot better than PLA.

The printed parts

  • Teardrop nose× 3

    Which way up
    Flat face down, dome up
    Supports
    None
    Time
    About 20 minutes

    Holds half of the steel ball. Print a few, so there are spares to try.

    STL ↓
  • Teardrop tail, with the tether's channel and a pocket for its knot× 3

    Which way up
    Flat face down, point up
    Supports
    None
    Time
    About 30 minutes

    If the tether's channel closes up at the point, open it with a 1.5 mm drill by hand.

    STL ↓
  • Piston, with the cone the teardrop's tail sits in

    Which way up
    Back face down, cone up
    Supports
    None
    Time
    About 50 minutes

    It's hollowed from the back to keep it light, because every gram it weighs comes out of the shot. It should slide down the tube under its own weight.

    STL ↓
  • Breech block, holding the barrel's end, the rod's guide, the catch and the cocked switch

    Which way up
    Base down
    Supports
    None
    Time
    About 2 hours 45 minutes

    The tube snaps down into its cradle. Print the wall around the rod's guide solid if you choose the steel washer.

    STL ↓
  • Muzzle cradle

    Which way up
    On its side
    Supports
    None
    Time
    About 30 minutes
    STL ↓
  • Spool, with a slotted flange the sensor counts

    Which way up
    On its slotted flange
    Supports
    None
    Time
    About 35 minutes

    Print it light, with two walls and 15% infill. It spins at about 50 turns a second during a shot, so its weight costs speed and has to be braked afterward. The one-way bearing is a press fit.

    STL ↓
  • Spool bracket, carrying the spool's shaft, the gearmotor, the brake's servo and the sensor

    Which way up
    Base down
    Supports
    None
    Time
    About 3 hours 15 minutes

    The bearing pockets are press fits. If they print a little tight, sand them; if loose, a dab of glue on each bearing's outer ring holds it.

    STL ↓

Assembly

  1. 1

    Make the teardrops. Thread the tether's end in through a tail's point, tie a double overhand knot and pull it back into the pocket behind the ball. Drop a steel ball into a nose, and glue the two halves face to face with the seams lined up.

    TrickyKeep glue off the tether where it leaves the point. A stiff, glued line there kinks and breaks after a few hundred shots.

    CheckShaken, nothing rattles, and a hard pull on the tether doesn't move the knot.

  2. 2

    Cut the tube to 180 mm and square its ends. Round the inside of the muzzle's edge with a deburring tool, then fine sandpaper, until a teardrop's tail slides in from any angle without catching.

    TrickyThis edge is what steers the teardrop home. Any sharp lip catches the tail, and the reel then pulls the teardrop sideways into the rim. Keep going until it feels like a smooth, rounded lip.

  3. 3

    Cut the carbon tube to 107 mm and sand both ends smooth, inside and out. Glue it into the piston's socket with epoxy, square to the piston's face.

    CheckWithout the spring, the piston slides down the tube under its own weight, end to end.

  4. 4

    Bolt the breech block to the top of the spine with two M5 screws into T-nuts, its back end about 62 mm from the spine's back end. Glue your washer to the back of its wall, around the rod's hole.

  5. 5

    Screw the lock solenoid onto the bridge, its tongue down through the slot, with the tongue's slanted side facing the barrel.

    CheckPushed up with a finger, the tongue springs back down by itself.

  6. 6

    Slide the spring over the rod, push the rod back through the wall's guide, and slide the collar onto the rod behind the block. Rest the piston on the cradle, slide the tube over it from the front, and press the tube down into the cradle until it snaps in.

  7. 7

    Push the piston back with a wooden dowel down the bore until the collar rides under the tongue and the tongue drops in front of it with a click. Set the collar on the rod so that, cocked, the piston's back face sits 40 mm in front of the wall, and fired, the collar rests on the washer. Tighten the collar.

    TrickyThe tongue holds the whole spring's push, about 16 N. Its square back must meet the collar's flat face fully. If they meet on a corner or a bevel, a knock can fire it, so check that tapping the block hard doesn't.

    CheckCocked, the spring is squeezed to about 40 mm. Fired by pushing the tongue up, the piston jumps 30 mm forward and the collar stops on the washer.

  8. 8

    Screw the cocked switch onto its pad, so the collar's back face presses its roller when the tongue holds the collar.

    CheckThe switch clicks as the cannon cocks, and clicks again when it fires.

  9. 9

    Press the one-way bearing into the spool's core, the right way round.

    TrickyIt only drives one way. Before pressing it in, slide it onto the dowel pin, hold the pin, and find the free direction. The spool must turn freely the way it turns when the tether is pulled off the bottom of its core toward the barrel.

  10. 10

    Press the two 626 bearings into the spool bracket's cheeks. Bolt the bracket to the spine's back end with two M5 screws. Slide the dowel pin through the brake-side bearing, the spool and the motor-side bearing, put the coupler on its end, and screw the gearmotor to its plate with its shaft in the coupler.

    CheckThe spool spins freely one way by hand, and turning it the other way turns the motor.

  11. 11

    Push the servo through the window in the bracket's tall cheek, screw its tabs on, and fit a horn hanging straight down behind the spool. Stick a strip of felt on the horn's tip, facing the spool's rim.

    TrickyCenter the servo before fitting the horn, then set the horn so that at the firmware's "on" position the felt presses the rim firmly, and at "off" it clears the rim by a millimeter or two. Too light and the spool spins on after a hit; touching when off and every shot drags.

  12. 12

    Screw the sensor board to its post, so the slotted flange passes through the middle of its slot.

    CheckTurned slowly by hand, the sensor's own light blinks as each slot passes.

  13. 13

    Pull the tether's free end through the piston from the cone's point, through the rod and out of its back end, using the threader. Tie it through the hole in the spool's flange, seat the teardrop in the cone, and wind the tether onto the spool by hand.

  14. 14

    Wire it, following the wire list under Wiring. The electronics go in a box on the frame, not on the cannon, with one cable to the cannon.

    TrickySet both converters with a multimeter before connecting anything to them. More than about 6 V on the 5 V side destroys the ESP32. More than 12 V on the other side overheats the solenoid and the gearmotor.

    CheckWith the battery in and no code running, nothing moves, the tongue is out and the ESP32's light is on. Press the stop button, release it, and nothing moves.

  15. 15

    Fix the spine in place pointing about 60 degrees down, and hang a target level across the shot, its middle on the line of the shot, about 13 cm out from the muzzle and 23 cm below it. Keep the space under the muzzle clear.

    TrickyThe target's struck face has to point back at the muzzle. Hit square on, the teardrop bounces back up its own path and hangs under the muzzle. Hit at a glancing angle, it keeps falling past the target and swings wide on its tether.

  16. 16

    Fire it by hand first. Pulse the catch from the bench console, with the brake off, and catch nothing. Then turn the spool backward by hand to reel the teardrop home and cock it.

    CheckThe teardrop strikes the middle of the target, hangs under the muzzle, and slides into the bore tail first when reeled. Cocking ends with the tongue's click.

  17. 17

    Load the firmware and let it fire, brake, reel and cock by itself. Measure the time from cue to strike for your target and give it to the firmware.

    TrickyThe brake has to close just as the teardrop lands. Too early and it slows the shot; too late and loose tether spins off the spool. Start it at the measured strike time and adjust a few milliseconds at a time.

    CheckTwenty shots in a row come home and cock without help, and the tether lies neatly on the spool afterward.

Wiring

The fuse comes first, right after the battery. The ESP32 and the brake's servo run from the 5 V converter. The gearmotor and the catch run at 12 V from a second converter, fed through the stop button and then the relay, so either one cuts them. Each switches through a MOSFET with a diode across it. The electronics sit in a box on the frame, with one cable to the cannon. The status light, the number switches and the battery reading are wired the same way on every element, so they're on the Control page, not here.

Wiring · Cannon
PowerSignalGround, all joinedPins drawn faint are left empty.

Wire list

  1. Battery adapter, +

    Fuse, 2 A, in

    PowerRed, 16 AWG

    As short as the adapter allows. Nothing connects ahead of the fuse.

  2. Fuse, 2 A, out

    5 V converter, IN+

    PowerRed, 22 AWG

  3. Fuse, 2 A, out

    Stop button, 11

    PowerRed, 18 AWG

  4. Stop button, 12

    Relay module, COM

    PowerRed, 18 AWG

    The stop button's main contact opens when pressed, cutting the gearmotor's and the catch's power itself, so a program that hangs can't ignore it.

  5. Relay module, NO

    12 V converter, IN+

    PowerRed, 18 AWG

  6. 12 V converter, OUT+

    Catch (lock solenoid), +

    PowerRed, in the cable to the cannon

  7. 12 V converter, OUT+

    Gearmotor, +

    PowerRed, in the cable to the cannon

  8. Capacitor, 100 µF, +

    12 V converter, OUT+

    PowerThe capacitor's own leg

    Solder its legs straight onto the converter's output. The stripe on its side marks the − leg.

  9. 5 V converter, OUT+

    ESP32 board, 5V

    PowerRed, 22 AWG

    Only once the converter is set to 5 V.

  10. 5 V converter, OUT+

    Relay module, VCC

    PowerRed, 22 AWG

  11. 5 V converter, OUT+

    Brake servo, 5V

    PowerRed, in the cable to the cannon

    The stop button doesn't cut the brake. It holds the spool, which is what you want when everything stops.

  12. ESP32 board, 3V3

    Spool sensor, VCC

    PowerIn the cable to the cannon

  13. Catch (lock solenoid), −

    MOSFET for the catch, D

    PowerIn the cable to the cannon

    Seen from the front, the MOSFET's legs are G, D and S, left to right.

  14. Catch (lock solenoid), −

    Diode, 1N5819, A

    PowerThe diode's own leg

  15. Diode, 1N5819, K

    Catch (lock solenoid), +

    PowerThe diode's own leg

    Soldered across the solenoid's two leads at the cannon, with its stripe toward +. It soaks up the kick when the solenoid lets go.

  16. Gearmotor, −

    MOSFET for the gearmotor, D

    PowerIn the cable to the cannon

  17. Gearmotor, −

    Diode, 1N5819, A

    PowerThe diode's own leg

  18. Diode, 1N5819, K

    Gearmotor, +

    PowerThe diode's own leg

    Across the gearmotor's two tabs, stripe toward +.

  19. Battery adapter, −

    5 V converter, IN−

    GroundBlack, 22 AWG

  20. Battery adapter, −

    12 V converter, IN−

    GroundBlack, 18 AWG

  21. 12 V converter, OUT−

    MOSFET for the catch, S

    GroundBlack, 22 AWG

  22. 12 V converter, OUT−

    MOSFET for the gearmotor, S

    GroundBlack, 22 AWG

  23. Capacitor, 100 µF, −

    12 V converter, OUT−

    GroundThe capacitor's own leg

  24. 5 V converter, OUT−

    ESP32 board, GND

    GroundBlack, 22 AWG

  25. ESP32 board, GND

    MOSFET for the gearmotor, S

    GroundBlack, 22 AWG

    The MOSFETs switch on the ESP32's signals, so they have to share its ground.

  26. Relay module, GND

    ESP32 board, GND

    GroundBlack, 22 AWG

  27. Resistor, 10 kΩ, 2

    ESP32 board, GND

    GroundThe resistor's own leg

  28. Resistor, 10 kΩ, 2

    MOSFET for the catch, S

    GroundThe resistor's own leg

  29. Resistor, 10 kΩ, 2

    MOSFET for the gearmotor, S

    GroundThe resistor's own leg

  30. Brake servo, GND

    ESP32 board, GND

    GroundBlack, in the cable to the cannon

    The servo, the sensor and the switch share one ground core in the cable.

  31. Spool sensor, GND

    ESP32 board, GND

    GroundIn the cable to the cannon

  32. Cocked switch, COM

    ESP32 board, GND

    GroundIn the cable to the cannon

  33. Stop button, 14

    ESP32 board, GND

    GroundBlack, 22 AWG

  34. Test button, 2

    ESP32 board, GND

    GroundBlack, 22 AWG

  35. ESP32 board, GPIO 33

    Relay module, IN

    SignalAny color, 22 AWG

  36. Resistor, 10 kΩ, 1

    Relay module, IN

    SignalThe resistor's own leg

    Holds the relay off while the ESP32 starts, when its pins float.

  37. ESP32 board, GPIO 25

    Resistor, 100 Ω, 1

    SignalAny color, 22 AWG

  38. Resistor, 100 Ω, 2

    MOSFET for the catch, G

    SignalThe resistor's own leg

  39. Resistor, 10 kΩ, 1

    MOSFET for the catch, G

    SignalThe resistor's own leg

    Holds the catch off while the ESP32 starts. Without it, a floating pin could fire the cannon as it powers up.

  40. ESP32 board, GPIO 26

    Resistor, 100 Ω, 1

    SignalAny color, 22 AWG

  41. Resistor, 100 Ω, 2

    MOSFET for the gearmotor, G

    SignalThe resistor's own leg

  42. Resistor, 10 kΩ, 1

    MOSFET for the gearmotor, G

    SignalThe resistor's own leg

  43. ESP32 board, GPIO 27

    Brake servo, SIG

    SignalIn the cable to the cannon

  44. Cocked switch, NO

    ESP32 board, GPIO 32

    SignalIn the cable to the cannon

    The normally open contact, closed while it's cocked. A broken wire then reads as not cocked, so the motor runs on to its time limit and the cannon holds in a fault, rather than thinking it's ready.

  45. Spool sensor, DO

    ESP32 board, GPIO 19

    SignalIn the cable to the cannon

  46. Stop button, 13

    ESP32 board, GPIO 13

    SignalAny color, 22 AWG

    The stop button's spare contact, so the ESP32 knows it's been pressed.

  47. Test button, 1

    ESP32 board, GPIO 15

    SignalAny color, 22 AWG

    The test button. The ESP32's own pull-up holds the pin high until it's pressed. The board reads GPIO 15 as it starts, but only to choose whether to print, so holding the button then does no harm.

Get these right

Set both converters first
Most converters come set higher than you want. With the battery in and a multimeter on each output, turn the 5 V one to 5.0 V and the 12 V one to 12.0 V, and only then connect anything to them. More than about 6 V destroys the ESP32.
Pulse the catch, never hold it
A lock-style solenoid overheats in a minute if it's left on. The firmware pulses it for about 50 ms to fire. If the solenoid ever gets hot, look for a MOSFET stuck on.
The cable to the cannon
Ten cores are used: the catch's two, the gearmotor's two, the servo's power and signal, the sensor's power and signal, the switch's signal, and one ground shared by the servo, the sensor and the switch. Leave enough slack for whatever aims the cannon to turn it.
The gearmotor's direction
The gearmotor only ever winds. If it turns the spool the wrong way when first powered, swap its two leads at the cannon, then swap its diode to match.
The pins
Any free ESP32 pins will do, except 0, 2, 5 and 12, which the board reads as it starts, and 34 to 39, which have no pull-up for the switches. The board reads 15 as it starts too, but only to choose whether to print, so 15 carries the test button on every element. If you use others, the firmware needs to know.

Mounting

Everything on the cannon fixes to its spine, a 20 x 20 V-slot bar, with M5 screws into T-nuts, so each part slides along it for fitting. The spine is the only thing that fixes to whatever aims it. Nothing hangs under the cannon, because after every hit the teardrop swings through the space below the muzzle.

The breech block
Two M5 screws down through its base into T-nuts in the spine's top slot, its back end about 62 mm from the spine's back end.
The barrel
It snaps down into the breech block's cradle at the back and the muzzle cradle at the front. The breech block's wall stops its back end.
The muzzle cradle
One M5 screw through its tab into a T-nut in the spine's side slot, about 30 mm from the spine's front end.
The spool bracket
Two M5 screws down through its base into the spine's top slot, flush with the spine's back end. The brake's servo pokes out behind it.
The spine
Hold it by its back half, through its bottom or side slots, so nothing reaches into the space below the barrel. Two corner brackets fix it to any 20 mm frame; on a turret, a plate across its bottom slot does the same. It points about 60 degrees down.
The target
Hang it level across the shot on two cords at its nodes, 22.4% in from each end, with its middle on the line of the shot. We started 13 cm out from the muzzle along the ground and 23 cm below it.
The electronics
In a box on the frame, away from the cannon and out of the swing, with one twelve-core cable to the cannon. Keep the stop button on the outside of the box.

The electronics

Hidden in a box, or on show?

Closed boxWhere we started

A small project box, bought or printed, on the frame. Tidy and safe from a stray teardrop, but it hides the electronics.

Open plate

The boards on standoffs on a flat plate, with the wires dressed along the frame. The electronics become part of the look. It wants neat wiring, and nothing guards it.

DIN rail

A short length of 35 mm DIN rail on T-nuts, each board in a snap-on holder. It looks like a control panel, and any board comes off with a flick.

Whichever you pick, keep the stop button on the outside, where anyone can reach it.

Tuning

Tuning

The test button
A short press fires it once, about a second after you let go, and it reels in and cocks as after any shot, so keep clear of the muzzle. Hold it for two seconds and it rewinds slowly and cocks, until the cocked switch closes. It works only while the element is resting, with no Bridge in range or with the Bridge holding it silent. While it plays or is stopped, the button does nothing. A stop ends a test at once, and pressing again ends one early. The time from cue to strike and the brake's timing are still set at the console.
A thud where there should be a ring
The target is held too tightly or touching something, or the teardrop is landing too close to a node. Hang it by cords at its nodes, 22.4% in from each end, and aim at its middle.
The teardrop comes home swinging wide, or wraps the muzzle
It's leaving the target with too much speed across its tether. Point the cannon more steeply down, aim closer, turn the target so its face points straight back at the muzzle, or reel more slowly.
It catches on the muzzle instead of sliding in
Round the muzzle's edge more, and check the tether leaves through the middle of the cone, so the tail is drawn to the center of the bore.
Loose tether on the spool after a shot
The brake is closing late or pressing too lightly. Bring it forward a few milliseconds, or press harder with a slightly longer horn.
A weak or short shot
Something is dragging. The brake pad touching when off, the tether rubbing at the ends of the carbon tube, or the piston rubbing the bore. Fix those before reaching for a stiffer spring.
It fires when knocked
The tongue or the collar's face is worn round. File the tongue's back square, turn the collar round to a fresh face, or move the switch's pad so the tongue drops a little deeper into the collar's rim.
A pulse doesn't fire it
The tongue can't pull out from under the spring's load. Check the 12 V supply holds up during the pulse, polish the tongue and the collar where they meet, or use a lighter spring.
A crack on every shot
That's the collar hitting its stop. A thicker or softer washer quiets it. Or keep it, and use the steel washer if you like the report.
A whine on the rewind
The gearmotor is running flat out. Reel a little slower, which also keeps the swing under the muzzle smaller.

Variations

Straight down
Pointed straight down at targets below it, such as a gong lying flat, a drum, a bowl rim or the top of a capped tube, the teardrop bounces straight up and hangs right under the muzzle. It's the cleanest return of all, with nothing to swing.
Dynamics
A small motor turning a screw behind the spring's back end would change how hard it's squeezed, so each shot can be loud or soft. Not drawn yet.
A faster reload
A 25 mm gearmotor (a JGA25-370 at about 300 rpm) reels about twice as fast and cocks easily. It's heavier, and it needs a new motor plate on the bracket.
A fishing reel instead of the spool
A closed-face spincast reel, its crank turned by the gearmotor, lets the tether slip off a spool that doesn't turn, so nothing spins on after a hit and the brake isn't needed. It needs a stronger motor and something to press its button before each shot.
Hiding the click
The catch's click comes just before each strike. Keep it as part of the sound, or wrap the solenoid in foam and add felt under the tongue's slot.